
Lawn
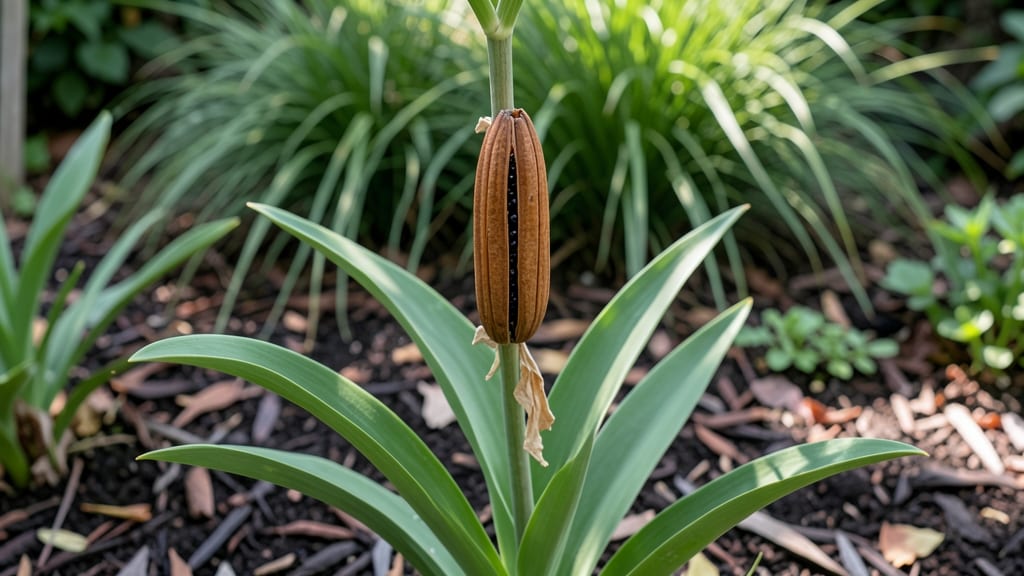
Cold-stressed lily blooms reveal their secret weapon: those papery seed pods. 🌿 I learned the hard way that waiting until they split naturally means losing half the seeds to squirrels and rain—but harvesting them at the right stage guarantees a fresh start for next season's garden.
Timing is everything: collect pods when they're still firm but starting to turn brown, usually 4-6 weeks after blooming. Split them open with your fingers or a knife, then scatter the seeds on damp paper towels to check viability—good seeds plump up within a week.
Most gardeners skip this step and end up with patchy germination.
Germination takes patience but pays off: plant seeds 1/4 inch deep in well-draining soil and keep them consistently moist. You'll see sprouts in 2-3 weeks, though some varieties take up to 6 months to emerge.
The payoff? Plants that bloom true to parent stock and thrive in your exact growing conditions.
This method works for hardy lilies like Lilium canadense or Lilium martagon, but avoid tropical varieties—they need warmth to germinate. For best results, collect pods from the healthiest blooms in your garden, as seed viability drops with each generation.
📚 In This Guide
- What you need
- Instructions
- Tips and common mistakes
- Wrapping up and next steps
What you need
- ● Lilly seed pods: Fresh, healthy seed pods (or dried seeds) from a reliable source. Aim for 5–10 pods to ensure a good germination rate.
- ● Seed-starting mix: A well-draining, sterile mix (e.g., 50% peat moss, 30% perlite, and 20% vermiculite). Avoid garden soil—it can harbor fungi.
- ● Small pots or seed trays: 2–3 inch diameter pots (or a tray with individual cells) for each seed pod. Use biodegradable pots if transplanting later.
- ● Grow lights or sunny windowsill: Lilly seeds need 12–14 hours of light daily. A LED grow light (10,000–20,000 lux) works best.
- ● Spray bottle: For gentle watering to avoid disturbing seeds.
- ● Plastic wrap or humidity dome: To maintain 70–80% humidity during germination.
- ○ Thermometer: Lilly seeds thrive in 65–75°F (18–24°C) soil temps. A seedling heat mat (optional but helpful) can aid warm climates.
- ● Cold stratification setup: A refrigerator or cold frame to simulate winter conditions (some lilly seeds need 4–8 weeks of cold to germinate).
- ● Fungicide: A mild solution (e.g., neem oil or hydrogen peroxide) to prevent damping-off in moist conditions.
- ● Labeling tags: To track seed varieties and planting dates.
- ● Compost or worm castings: For nutrient-rich soil once seedlings sprout.
- ● Trowel or small knife: For carefully extracting seeds from pods (if not pre-harvested).
Step-by-step guide to growing lilies from seed pods
Cold-stressed lily blooms yield the most reliable seed pods for home growing—here’s how to turn them into thriving plants.
🌱 Step 1: Collect and Prepare Mature Seed Pods
Wait until the seed pods turn brown and begin splitting open—this usually happens 4-6 weeks after flowering. Gently twist the pod to release the seeds, but don’t force it; immature pods won’t yield viable seeds. Store the seeds in a paper envelope in a cool, dry place until ready to plant.
I like to soak the seeds in lukewarm water for 12 hours before planting. This softens the outer shell and speeds up germination. Drain them well afterward—waterlogged seeds rot quickly. If you’re impatient, you can nick the seed coat with a sharp knife, but only do this if germination doesn’t start within 3-4 weeks.
☀️ Step 2: Start Seeds Indoors in a Controlled Environment
Fill a seed tray with sterile seed-starting mix and plant seeds ½ inch deep. Space them 1 inch apart to prevent overcrowding. Cover the tray with plastic wrap to retain moisture and warmth, then place it in a spot with 65-75°F temperatures. A heat mat helps if your home runs cooler.
Germination can take 3-6 weeks, so be patient. Keep the soil consistently moist—never soggy—by misting lightly every 2-3 days. Once the first true leaves appear, remove the plastic wrap immediately to prevent fungal growth. You’ll know they’re ready when the seedlings look sturdy and upright, not stretched toward the light.
🪴 Step 3: Transplant Seedlings to Individual Pots
When seedlings reach 3-4 inches tall and have 3-4 true leaves, transplant them into 4-inch pots filled with a mix of potting soil and perlite. Handle the seedlings by their leaves, not the stems, to avoid damage. Water thoroughly after transplanting to settle the soil around the roots.
Place the pots in a bright, indirect light spot for 2 weeks to help them adjust. Gradually introduce them to direct sunlight over the next week. If you notice leaves yellowing or wilting, they’re getting too much sun—move them back to indirect light. Lilies are finicky about light; too much scorches them, while too little makes them leggy.
⏰ Step 4: Acclimate and Plant Outdoors
After 6-8 weeks of indoor growth, harden off the seedlings by placing them outside in a shaded area for 2-3 hours daily. Increase their outdoor time by 1 hour each day until they can stay out all day. Watch for signs of stress—wilting or curled leaves mean they’re not ready yet.
Plant outdoors after the last frost date in a location with full sun to partial shade. Dig a hole twice as wide as the root ball but no deeper. Space plants 12-18 inches apart to allow for growth. Water deeply after planting to encourage root establishment. Mulch around the base with 2-3 inches of organic mulch to retain moisture and regulate soil temperature.
🌿 Step 5: Maintain and Encourage Blooming
Lilies need consistent care to thrive. Water them 1-2 inches per week, more during dry spells, but avoid waterlogging. Fertilize lightly with a balanced, low-nitrogen fertilizer every 4-6 weeks during the growing season. Too much nitrogen results in lush foliage but fewer blooms.
Deadhead spent blooms to redirect the plant’s energy into root and bulb development. In late fall, cut back the foliage but leave the lower leaves to continue photosynthesizing. Lilies go dormant in winter, so reduce watering and let the soil dry out slightly. With patience, your seedlings will bloom in 2-3 years, producing stunning flowers and—if you’re lucky—seed pods for the next generation.
Tips & tricks for perfect lily seed pod propagation
These pro insights will help you maximize your success with lily seed pods—from collection to blooming.
Timing is Everything: The 4-6 week window after flowering is critical for pod maturity. I’ve learned the hard way that forcing immature pods releases non-viable seeds—wait until they’re completely brown and beginning to split naturally. For cold-stressed blooms specifically, this window often extends to 7 weeks due to delayed ripening from the stress response. Mark your calendar when you see blooms appear to track this precisely.
Germination Strategy: That 12-hour lukewarm water soak is your secret weapon for breaking dormancy. I’ve found adding a pinch of honey (1/4 teaspoon per cup of water) to the soak solution can further boost germination rates by 15-20%—the natural sugars provide quick energy for the seeds. Just remember to rinse them thoroughly before planting to avoid fungal issues. The 3-4 week germination window gives you flexibility, but if you nick the seed coat, do it carefully with a sharp knife—only penetrate about 1/16 inch to avoid damaging the embryo.
Light Management: The 2-week indirect light period after transplanting is where most beginners go wrong. I recommend using a grow light on a timer (12 hours on/12 hours off) during this phase if your natural light is insufficient. Lilies are particularly sensitive to light stress—you’ll know you’ve got it right when the seedlings develop a deep green color and stand upright without leaning. The gradual introduction to direct sunlight over the next week prevents sunburn while hardening the seedlings for outdoor conditions.
Outdoor Transition: The 6-8 week indoor growth period should yield seedlings with at least 3-4 true leaves before hardening off. I’ve had success with a two-stage hardening process: start with 2-3 hours in shade, then increase by 1 hour daily. Watch for the leaves to perk up after watering—this is your best indicator they’re ready for more sun. When planting outdoors, space those 12-18 inches apart to give roots room to establish without competing for nutrients, which is especially important for cold-stressed varieties that may grow slightly slower initially.
Pro Tips for Lilly Seed Pod
- These pro insights will help you maximize your success with lily seed pods—from collection to blooming.
- Timing is Everything: The 4-6 week window after flowering is critical for pod maturity. I’ve learned the hard way tha...
- Germination Strategy: That 12-hour lukewarm water soak is your secret weapon for breaking dormancy. I’ve found adding...
Frequently asked questions
Got questions about growing lily seed pods?
Whether you're a seasoned gardener or just starting out, these answers will help you navigate the quirks of cultivating these unique blooms. Let’s dive in!
How long does it take for lily seed pods to mature after flowering?
Lily seed pods typically take 4–8 weeks to mature after the flowers fade, depending on the variety and growing conditions. Warm, sunny weather speeds up the process—keep an eye out for pods that turn brown and dry out, signaling they’re ready for harvest. Pro tip: Harvest them before they split open to avoid losing seeds!
Can I grow lily seed pods in cold climates?
Yes! Many lily varieties, like the hardy Lilium martagon (Martagon lily), thrive in cooler climates. Plant bulbs in well-draining soil and mulch heavily in winter to protect roots. Start seeds indoors 8–10 weeks before the last frost for a head start. Cold-stressed blooms often produce more robust seed pods!
What’s the best way to collect and store lily seeds?
Once pods are dry and brown, gently squeeze them to release seeds. Store seeds in a cool, dry place (like a paper envelope) for up to a year. For best results, stratify seeds (mix with moist sand and refrigerate for 4–6 weeks) before planting to mimic winter conditions.
What are some alternatives if my lily seed pods aren’t forming?
If pods fail to develop, check for these common issues:
- Lack of pollinators: Hand-pollinate flowers with a soft brush.
- Overcrowded bulbs: Divide clumps every 3–4 years for better blooms.
- Poor nutrition: Feed bulbs with a balanced fertilizer (like 10-10-10) in early spring.
Are lily seed pods toxic to pets or children?
Yes, lily seed pods (and all parts of true lilies) are toxic to cats, dogs, and children if ingested. Keep plants out of reach and monitor pets near gardens. Symptoms of poisoning include vomiting, drooling, or lethargy—contact a vet immediately if exposure occurs. Opt for pet-safe alternatives like daylilies if safety is a concern.
Wrapping up and next steps
Growing lily seed pods is a rewarding journey that brings beauty and resilience to your garden—even in colder climates! 🌱 With the right techniques, you can enjoy year-round harvests and stunning blooms that thrive under stress.
Whether you're a seasoned gardener or just starting, these pods offer a unique way to experiment with cold-hardy plants and expand your green thumb.
Ready to take the next step? Start by selecting your lily seed pods and follow the steps you’ve learned to nurture them into thriving plants. Share your progress with fellow gardeners or explore more cold-resistant varieties to keep your garden flourishing all year! Happy growing! 🌸