
Lawn
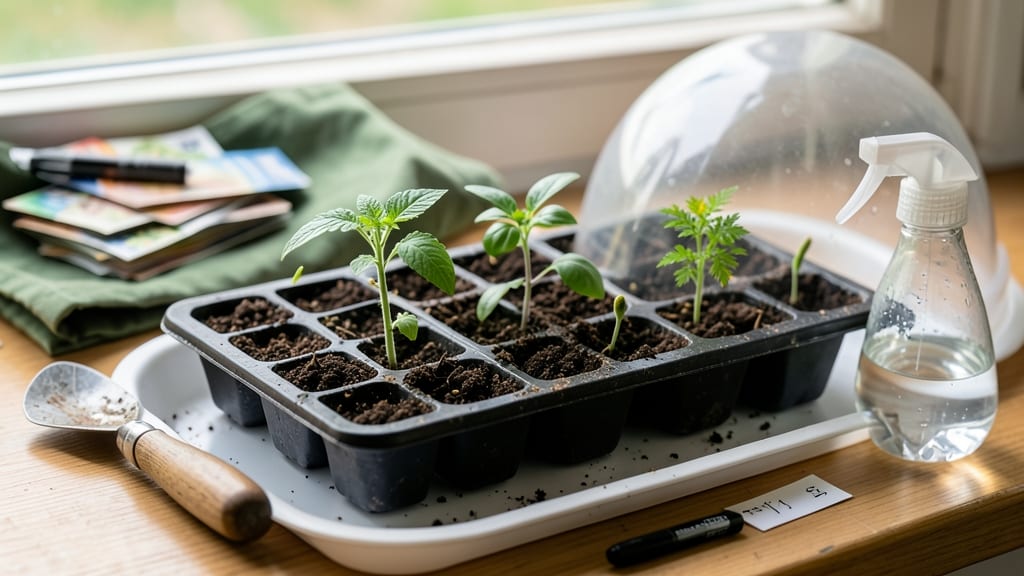
How to use seed starter trays transforms tiny seeds into sturdy seedlings that outperform store-bought plants. 🌱 I’ve used them for years to get a head start on spring, and the difference in plant strength is night-and-day compared to direct sowing. The secret lies in controlling moisture, light, and temperature—something Mother Nature can’t always guarantee when you plant outside.
You’ll need just a few basics: seed starter trays (with or without domes), quality seed-starting mix, your chosen seeds, and a spray bottle for gentle watering. No fancy tools required—just patience and consistency.
The right mix is key; it should hold moisture but drain well, and sterilized mix prevents damping-off disease that kills seedlings before they sprout.
Once your seeds germinate, you’ll watch them grow into thick, dark-green seedlings ready for transplanting in just 4-6 weeks. The trays keep roots contained so they don’t get leggy or tangled, and you can move them to the sunniest window or under grow lights as needed.
Proper spacing in the tray also prevents overcrowding, which leads to weak stems.
Even if you’ve had seedling failures before, this method works—90%+ germination rates are possible with the right care. The biggest mistake? Overwatering or letting the soil dry out. Keep it consistently moist (not soggy) and you’ll have seedlings that thrive from day one. Ready to give it a try?
📚 In This Guide
- What you need
- Instructions
- Tips and common mistakes
- Wrapping up and next steps
What you need
- ● Seed starter trays – 1–2 trays (6–12 cell packs work best for most seeds; biodegradable or plastic options available).
- ● Seed starting mix – 1 bag (sterilized, soil-less mix like peat moss or coconut coir blends; avoid garden soil—it’s too dense!).
- ● Seeds – Your chosen variety (check seed packets for depth/spacing guidelines).
- ● Watering can or spray bottle – With a fine mist nozzle to avoid disturbing seeds.
- ● Plastic wrap or humidity dome – 1 sheet (to retain moisture while seeds germinate).
- ● Grow lights or sunny windowsill – 6+ hours of indirect light daily (or LED grow lights for 12–16 hours).
- ○ Labels & markers – To track seed types/planting dates (optional but highly recommended!).
- ● Heat mat – For cold-weather germination (e.g., peppers, tomatoes).
- ● Tweezers – For delicate seeds (like orchids or succulents).
- ● Fertilizer (diluted) – ½ strength liquid fertilizer (e.g., fish emulsion) after sprouts emerge.
- ● Bottom tray or saucer – To catch excess water and prevent root rot.
- ● Fan (small, low-speed) – For airflow to strengthen seedlings (prevents damping off).
Step-by-Step instructions for using seed starter trays
Here's how to transform those empty trays into a seedling powerhouse—no guesswork, just reliable growth.
🌱 Step 1: Prepare the Tray and Soil for Optimal Germination
Start by filling each cell of your seed starter tray with a high-quality seed-starting mix. Avoid garden soil—it's too dense and can harbor pathogens. I like to press the mix down lightly with my fingers until it's firm but not compacted. This creates a stable base for tiny roots to anchor into without smothering them.
Moisten the mix thoroughly until it's damp to the touch, like a wrung-out sponge. You'll know it's right when water runs out the drainage holes at the bottom but doesn't pool. This ensures even moisture without waterlogging. A spray bottle works well for precision, but a gentle watering can avoids disturbing the soil surface.
🌱 Step 2: Plant Seeds at the Correct Depth and Spacing
Read the seed packet for specific depth requirements, but as a general rule, plant seeds at a depth equal to 2-3 times their diameter. For tiny seeds like lettuce, a light press into the surface works; for larger seeds like beans, press them in ½ inch deep. I use a toothpick to make a small hole—it's more precise than my fingers.
Place only 1-2 seeds per cell unless the packet specifies otherwise. Overcrowding leads to weak, leggy seedlings that compete for light. After planting, cover the seeds with a thin layer of soil, just enough to obscure them. Pat gently to ensure good soil-to-seed contact, which speeds up germination.
💧 Step 3: Provide Consistent Moisture and Warmth
Place the tray in a warm location, ideally between 65-75°F. A seedling heat mat set to 70°F accelerates germination, especially for slower starters like parsley or carrots. I cover the tray with a clear plastic dome or plastic wrap to retain humidity—this mimics the moist, protected environment seeds crave.
Check moisture daily but resist the urge to water immediately. The dome traps enough condensation to keep the soil damp. Once you see the first sprouts, remove the dome to prevent fungal issues like damping-off. Water from the bottom by placing the tray in ½ inch of water for 10-15 minutes, letting the soil absorb moisture evenly.
☀️ Step 4: Introduce Light Gradually for Strong Seedlings
The moment seedlings emerge, move them to a bright location with 12-16 hours of light daily. A south-facing window works for small batches, but most homes lack sufficient intensity. I use a grow light on a timer, positioned 2-4 inches above the tray. Raise it as seedlings grow to maintain that distance.
Watch for leggy growth—pale, stretched stems with large leaves—this means the light is too far away. Strong seedlings have thick stems, dark green leaves, and compact spacing between nodes. Rotate the tray a quarter turn daily so seedlings grow straight instead of leaning toward the light.
✂️ Step 5: Thin and Transplant When Ready
Once seedlings develop their first true leaves (not the initial cotyledons), thin to the strongest seedling per cell. Use scissors to snip weak stems at soil level—this prevents disturbing the roots of remaining plants. If you're transplanting into a larger tray, do it gently, keeping the root ball intact.
Hardening off begins 2 weeks before the last frost. Start by placing seedlings outside in a sheltered spot for 1-2 hours daily, gradually increasing exposure. You'll know they're ready for the garden when they tolerate a full day outside without wilting. Transplant on a cloudy day or in the evening to reduce stress.
Tips & tricks for perfect seed starter trays
Transforming those empty trays into thriving seedling starters takes more than just filling cells—here's how to maximize every step.
Soil Preparation: When pressing down the seed-starting mix in Step 1, aim for a texture like damp sand—not too firm, not too loose. This balance prevents compaction that can suffocate roots while still providing stability. I like to use a small spoon to gently tamp each cell after filling, which creates just the right resistance for tiny roots to grip.
Seed Spacing: In Step 2, the 2-3 times diameter rule works perfectly, but here's the secret: for seeds like basil or parsley, you can actually plant them slightly deeper (up to ¼ inch deeper than the rule) since they handle more moisture. This prevents them from drying out too quickly while still ensuring proper germination. The toothpick trick is especially helpful for delicate seeds that might get crushed by fingers.
Light Management: The 12-16 hours of light in Step 4 is crucial, but timing matters just as much. I set my grow light timer for 14 hours on/2 hours off to mimic natural daylight cycles. This prevents seedlings from getting "light shock" when suddenly exposed to full light. Also, if you notice seedlings leaning, it's not just about distance—rotate the tray every 8 hours (not just daily) to ensure even growth.
Hardening Off: The 2-week hardening off period in Step 5 is your chance to build resilience. Start with just 1 hour on day one, then add 30 minutes each subsequent day. I've found that placing seedlings in a spot with dappled sunlight (like under a tree) during this period helps them develop stronger cell walls than direct sun exposure would.
Pro Tips for Use Seed Starter Trays
- Transforming those empty trays into thriving seedling starters takes more than just filling cells—here's how to maxim...
- Soil Preparation: When pressing down the seed-starting mix in Step 1, aim for a texture like damp sand—not too firm, ...
- Seed Spacing: In Step 2, the 2-3 times diameter rule works perfectly, but here's the secret: for seeds like basil or ...
Frequently asked questions
Got questions about seed starter trays? You’re not alone—gardeners often wonder about timing, materials, and troubleshooting. Here’s a quick breakdown of the most common queries to help you grow with confidence!
What’s the best time to transplant seedlings from trays to the garden?
Transplant seedlings when they’ve developed 2-3 true leaves (not the initial seed leaves) and have sturdy stems. For most veggies, this happens 4-6 weeks after sowing. Wait until nighttime temps stay above 50°F (10°C) to avoid frost damage. Harden off seedlings by gradually exposing them to outdoor conditions for 5-7 days before planting.
How long do seeds take to germinate in starter trays?
Germination time varies by plant—fast growers like radishes sprout in 3-7 days, while slower ones (e.g., tomatoes, peppers) take 7-21 days. Keep trays in a warm (70-80°F / 21-27°C), moist environment with indirect light until sprouts appear. If nothing emerges after 2-3 weeks, test seed viability or try resowing.
Can I reuse seed starter trays, or should I buy new ones each year?
Yes! Clean and sanitize trays with a 10% bleach solution (1 part bleach to 9 parts water) or soapy water to kill pathogens. Rinse thoroughly and let dry. Reusing saves money, but avoid using them for different plant families (e.g., tomatoes and nightshades) consecutively to prevent soil-borne diseases. Plastic trays last years; biodegradable ones (like peat pots) should be composted after use.
Why are my seedlings leggy or stretching in the starter tray?
Leggy seedlings result from too little light or overcrowding. Move trays to a sunny windowsill or under grow lights (12-16 hours/day). If space is tight, thin seedlings to 1 inch apart and ensure proper airflow. Avoid overwatering—keep soil moist but not soggy. For extra support, bury trays slightly deeper or add a small stake near seedlings.
What’s a good alternative to seed starter trays for beginners?
If trays feel tricky, try these beginner-friendly options:
- Egg cartons: Poke drainage holes, fill with soil, and plant seeds directly (biodegradable!).
- Paper towels or coffee filters: Fold into a "pouch," moisten, and place seeds inside (great for tiny seeds like herbs).
- Toilet paper rolls: Cut into 3-inch sections, fill with soil, and plant seeds (remove the bottom for drainage).
- Yogurt cups or milk cartons: Wash, poke holes, and use like mini pots (compost after use).
Wrapping up and next steps
Mastering seed starter trays is your first step toward a thriving garden—you’ve got this! 🌱 From choosing the right soil to transplanting seedlings with care, these trays simplify the process while boosting your success rate.
Now that you’re equipped with pro tips, it’s time to get growing—start small, experiment with different plants, and watch your green thumb shine!
Next up: Grab your trays, pick your favorite seeds, and dive in! Check out our guide on transplanting seedlings for the final step to a lush, flourishing garden.