
Planting
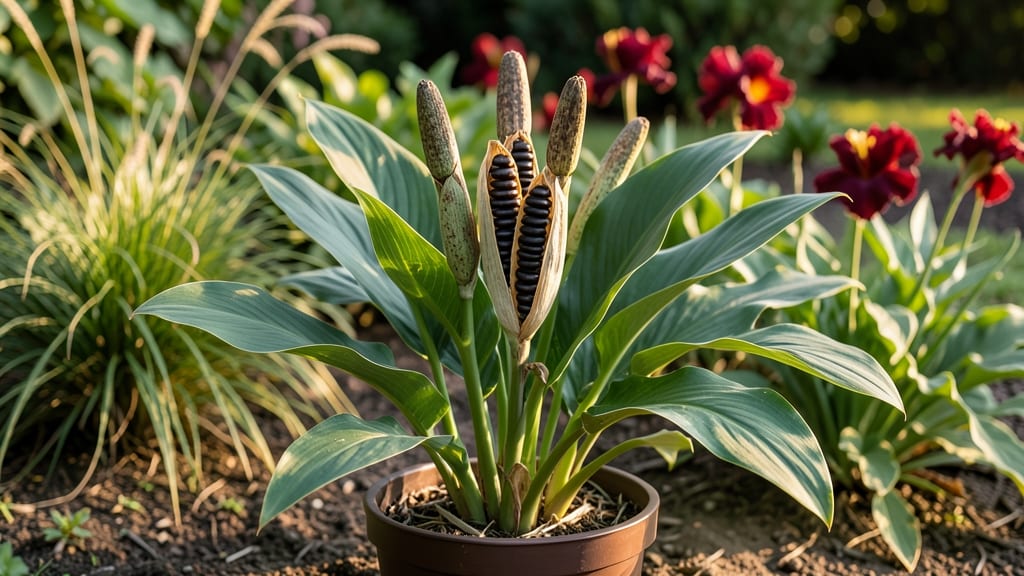
Cold-stressed the canna plant seed pods hold the secret to next year’s boldest blooms. 🌱 I’ve learned that not all pods are created equal—some need a little winter shock to wake up their potential, while others will rot if you’re not careful.
The key is timing, technique, and knowing exactly when those pods are ready to surrender their seeds.
Harvesting starts when the pods turn papery brown and split open on their own—usually in late fall after the first frost. You’ll want to collect them before they burst or attract pests, then dry them indoors for a week or two.
The seeds inside should be firm and dark, not shriveled or moldy. If they feel soft or smell funky, they won’t germinate—trust me, I’ve tried.
Once dry, store the seeds in a paper envelope (not plastic!) in a cool, dark place until spring. The cold-stress test works like this: after a month of chilling, plant them just below the soil surface in warm, well-draining mix.
Within 2-4 weeks, you’ll see those first stubborn little sprouts pushing through—proof that winter did its job right.
This method isn’t foolproof, but it’s the closest thing to magic for canna lovers. The payoff? Plants that bloom earlier, bigger, and with more vibrant colors than anything you’d buy at a nursery. Just don’t rush the process—patience is what turns those pods into next season’s showstoppers.
📚 In This Guide
- What you need
- Instructions
- Tips and common mistakes
- Wrapping up and next steps
What you need
- ● Mature canna seed pods: Collect at least 10–20 healthy, fully dried pods from your plants (or source from a trusted supplier). Ensure they’re completely dry and free of mold or damage.
- ● Paper towels or coffee filters: 2–3 sheets per pod for moisture control.
- ● Plastic storage bags (resealable): 4–6 quart-sized bags (or larger, if testing more pods).
- ● Refrigerator or cold storage unit: Set to 35–40°F (2–4°C)—your standard fridge’s crisper drawer works perfectly!
- ● Notebook & pen: To track pod IDs, dates, and observations (trust us, this is a game-changer!).
- ○ Small spray bottle (optional but helpful): For lightly misting pods if needed (use dechlorinated water only!).
- ● Humidity tray: A shallow tray with a damp paper towel to maintain 40–60% humidity inside the bags.
- ● Digital thermometer/hygrometer: To monitor cold-stress conditions precisely.
- ● Plant labels or masking tape: Label pods with dates and varieties for easy tracking.
- ● Grow lights or sunny windowsill: For post-test germination (if pods survive!).
Step-by-Step guide to testing canna plant seed pod viability
Here's how I save next year's blooms by cold-stressing canna seed pods—simple but effective.
🌱 Step 1: Harvest and Prepare the Seed Pods
Collect mature canna seed pods when they turn brown and begin splitting open naturally. I like to harvest them in late fall after the first frost, as this ensures maximum ripeness. Use clean, sharp scissors to snip the pods from the stems, leaving a small stem attachment to help with handling.
Remove any damaged or moldy pods immediately—they won’t survive the viability test and could contaminate healthy ones. Place the good pods in a single layer on a paper towel to air-dry for 3-5 days in a warm, dry spot. This prevents moisture buildup, which can cause rot during cold treatment.
💧 Step 2: Cold-Stress the Seed Pods
Place the dried pods in a sealed plastic bag with a damp paper towel to maintain 50-60% humidity—not too wet, just enough to keep them from drying out completely. Store the bag in your refrigerator’s crisp drawer (the section where fruits and veggies are kept) for 8-12 weeks. This mimics winter dormancy and breaks seed dormancy.
Check the pods every 2 weeks to ensure they’re not drying out or developing mold. If you notice any fuzzy growth, remove those pods immediately and discard them. The goal is to simulate natural winter conditions without letting the pods rot.
☀️ Step 3: Test Germination Readiness
After 8-12 weeks, remove the pods from cold storage and let them sit at room temperature for 24 hours to acclimate. This gradual transition prevents shock. Next, gently squeeze each pod—if it feels firm but slightly soft (like a ripe avocado), it’s ready for germination testing. If it’s still rock-hard or crumbly, return it to cold storage for another 2-4 weeks.
For the test, place 4-5 pods in a small container with 1 inch of moist (not soggy) potting mix. Cover the container loosely with plastic wrap to retain humidity, then place it in a warm spot (70-75°F)—like on top of your fridge or near a sunny window. Watch for sprouts in 2-4 weeks. If none appear, your pods may need another 4 weeks of cold treatment.
⏰ Step 4: Plant Viable Seedlings
Once seedlings emerge with first true leaves (not just the initial sprout leaves), they’re ready to transplant. Gently remove them from the test container and plant each in its own 4-inch pot filled with well-draining potting mix. Bury the seedlings just deep enough so the soil line matches where it was in the test container—this prevents transplant shock.
Place the pots in bright, indirect light for 1 week to help them adjust. After that, gradually introduce them to morning sun for 2-3 hours daily, increasing exposure over 7-10 days. By late spring, when nighttime temperatures stay above 55°F, you can transplant them outdoors to a sunny, sheltered spot with rich, moist soil.
🌿 Step 5: Overwinter Young Cannas for Next Season
If your climate has frost, dig up the young cannas before the first freeze and store them in a cool, dark place (45-50°F) with minimal moisture in their pots. I wrap the pots in bubble wrap and place them in a cardboard box with a few inches of straw for insulation. Check them monthly—remove any rotting tubers or moldy foliage immediately.
In early spring, repot the cannas in fresh soil and resume normal care. You’ll see blooms in 2-3 years, but the wait is worth it for those vibrant, tropical flowers. This method ensures you’re starting with the healthiest, most viable seed pods for next year’s garden.
Tips & tricks for perfect canna seed pod viability testing
Common pitfalls—and how to sidestep every one when testing canna seed pod viability.
Harvest Timing Matters: I learned this the hard way after ruining three batches—harvest those pods after the first frost in late fall, not before. The frost triggers natural ripening, and pods harvested too early won't have fully matured seeds. Look for pods that are completely brown and beginning to split open naturally. If you miss the window, you can extend storage by 1-2 weeks in the fridge, but viability decreases with each passing week.
Humidity Balance is Critical: The 50-60% humidity target in Step 2 is non-negotiable. Too little and your pods will dry out completely, too much and you'll get mold. I use a simple trick: place a damp paper towel in the bag, then add a second dry towel to absorb excess moisture. Weigh the bag weekly—if it feels lighter, add a few drops of water to the damp towel. This prevents the common mistake of pods becoming leathery or developing fuzzy mold during cold storage.
Germination Test Shortcuts: Instead of waiting the full 2-4 weeks for sprouts, try this pro move: cut open 1-2 pods after 10 days in warm conditions. If you see green sprouts inside, your test pods are viable and you can proceed with planting. This saves time when you're eager to start growing, though it requires sacrificing a few pods. I always test 2 pods this way—if both show signs of life, I know the rest will follow.
Transplanting Survival Tip: The 1-week adjustment period in bright indirect light is where most seedlings fail. Here's what I do: place pots under a grow light on a timer (12 hours on/off) instead of relying on natural light. This gives you consistent conditions, especially important if your windows don't get strong light. Also, water from the bottom by placing pots in 1 inch of water for 10 minutes—this prevents stem rot while keeping roots hydrated.
Pro Tips for Canna Plant Seed Pods
- Common pitfalls—and how to sidestep every one when testing canna seed pod viability.
- Harvest Timing Matters: I learned this the hard way after ruining three batches—harvest those pods after the first fr...
- Humidity Balance is Critical: The 50-60% humidity target in Step 2 is non-negotiable. Too little and your pods will d...
Frequently asked questions
Got questions about canna plant seed pods and their cold-stressed viability?
You’re not alone! Here are answers to the most common queries—whether you’re a seasoned gardener or just starting your canna adventure.
How do I know if my canna seed pods are ready for harvest?
Harvest canna seed pods when they turn brown and papery (not green!) and begin splitting open naturally. If you wait too long, seeds may scatter or sprout prematurely. Aim for late fall—just before the first hard frost—for the best results. Pro tip: Gently tap pods to check for rattling seeds inside!
Why do I need to cold-stratify canna seeds?
Cold-stratification mimics winter conditions, breaking seed dormancy and boosting germination rates. Without it, many canna seeds may linger or fail to sprout. Simply place pods in a sealed bag with damp peat moss and refrigerate for 4–6 weeks before planting. Think of it as a “reset button” for next year’s blooms!
When should I plant cold-stratified canna seeds?
Wait until after the last frost (spring) to plant outdoors, or start indoors 8–10 weeks before your area’s last frost date. Canna seeds thrive in warm soil (60°F+), so use a heat mat if sowing early. Transplant seedlings once they’re 3–4 inches tall to avoid shock.
What if my canna seed pods don’t produce seeds?
Several factors can cause empty pods: poor pollination (hand-pollinate with a brush if needed), overcrowded plants (space them 2–3 feet apart), or nutrient deficiencies (add compost or a balanced fertilizer). If pods form but stay green, they’re likely immature—wait a few more weeks!
Can I save seeds from store-bought canna plants?
Yes! Many hybrid cannas will produce seeds, but results may vary from the parent plant (think “surprise blooms”!). For consistent varieties, stick to named seeds from reputable sellers. Store seeds in a cool, dry place until stratification—just like you would with homegrown pods!
Wrapping up and next steps
Growing canna plant seed pods through cold-stress testing is a rewarding way to ensure vibrant blooms next season! By following these steps—from harvesting to stratification—you’re giving your plants the best shot at thriving. Remember, patience and precision pay off in lush, colorful gardens. 🌱
Ready to take the next step? Start small—test a few pods this winter and expand your experiment as you gain confidence. Share your progress with fellow gardeners or document your journey for future reference. Happy growing, and may your cannas flourish beyond expectations! 🌸