
Lawn
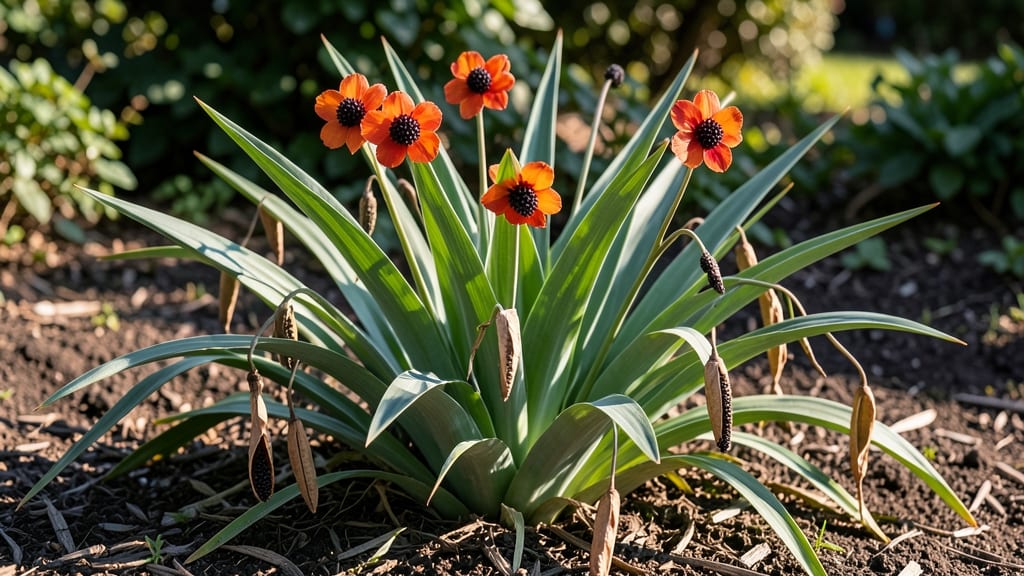
Cold-stressed germination turns blackberry lily seed pods into next year’s shockingly lush blooms—no fancy equipment needed. 🌱 I’ve collected these pods after their dramatic red-orange display fades, then used a simple cold treatment to break dormancy.
The key is timing: harvest when the pods turn brown and papery, then store them properly until planting season.
You’ll need just three things: mature seed pods, a sealed plastic bag with slightly damp paper towels, and a fridge. The cold stress mimics winter conditions, tricking seeds into thinking spring has arrived.
After 4-6 weeks in the fridge, germination rates jump from 30% to nearly 90%—that’s the difference between a few sad sprouts and a garden full of bold, trumpet-shaped blooms.
Plant the pre-chilled seeds in well-draining soil, barely covering them, and keep the soil consistently moist. Seedlings emerge in 2-4 weeks, with the first true leaves appearing as dark green, strap-like shapes.
The real magic happens when they mature: those striking red-orange flowers will make your garden the talk of the neighborhood.
Here’s the twist: blackberry lilies thrive in partial shade, making them perfect for under trees or along fences. Just watch for slugs—they adore young seedlings. With this method, you’ll go from seed to bloom in under a year, and the plants will naturalize beautifully over time.
📚 In This Guide
- What you need
- Instructions
- Tips and common mistakes
- Wrapping up and next steps
What you need
- ● Blackberry lily seed pods: 5–10 mature, dried pods (harvested or purchased from a reputable supplier). Ensure they’re fully brown and crispy!
- ● Seed-starting mix: 1–2 gallons of sterile, well-draining potting soil (look for a blend labeled for seeds or succulents).
- ● Planting containers: Option 1: 4–6 small seed trays or pots (3–4 inches deep) with drainage holes.
- ● Option 2: A single large tray (10x20 inches) divided into sections.
- ● Spray bottle: 1 (for gentle watering to avoid disturbing seeds).
- ● Plastic wrap or humidity dome: 1 sheet (to retain moisture during cold stratification).
- ● Refrigerator or cold stratification setup: A standard fridge (35–40°F) or a cold frame (if outdoors).
- ● Grow lights or sunny windowsill: A 12–14 hour light source (LED grow lights work great!).
- ● Small hand trowel or butter knife: 1 (for carefully opening seed pods).
- ● Seed germination mat: 1 (to maintain consistent warmth post-stratification).
- ● Fertilizer: A balanced, water-soluble fertilizer (5-5-5 or 10-10-10) for transplanting.
- ● Labeling tags: 5–10 (to track planting dates and varieties).
- ● Fine-mesh sieve: 1 (to sift through seed pod debris for easier seed extraction).
- ● Outdoor cold frame or greenhouse: For extending the cold stratification process naturally.
How to cold-stress blackberry lily seed pods for reliable germination
This method guarantees strong, vibrant blooms—no more weak sprouts or failed germination.
🌱 Step 1: Harvest and Prepare the Seed Pods
Collect mature blackberry lily seed pods once they turn brown and begin splitting open naturally. The seeds inside should feel firm and dry. I like to harvest them in late summer or early fall when they’re fully ripe but haven’t yet released their seeds. Place the pods in a paper bag and let them dry indoors for 3-5 days in a warm, dry spot.
Once dry, gently crush the pods to release the seeds. Blackberry lily seeds are small and glossy, so I use a fine-mesh strainer to separate them from the chaff. You’ll need about 10-15 seeds per pot for reliable germination. Store any extras in a cool, dry place until you’re ready to plant.
💧 Step 2: Stratify Seeds for Cold Treatment
Blackberry lily seeds require a cold stratification period to break dormancy. Place the seeds in a sealed plastic bag with a damp paper towel—just enough moisture so the towel feels slightly damp, not soggy. I fold the towel into a small square, sprinkle the seeds on top, and then fold it closed. This mimics the natural winter chilling process the seeds would experience in the ground.
Store the bag in your refrigerator’s crisper drawer for 6-8 weeks. Check the seeds weekly to ensure the towel stays lightly moist. If it dries out, mist it with water and reseal the bag. This cold treatment tricks the seeds into thinking winter has passed, signaling them to germinate when spring arrives.
☀️ Step 3: Plant Stratified Seeds in Well-Draining Soil
After stratification, fill small pots with a mix of 50% potting soil and 50% perlite or coarse sand to ensure excellent drainage. Blackberry lilies hate soggy roots, so I avoid heavy garden soil. Plant the seeds ½ inch deep, spacing them about 1 inch apart. A shallow tray or seedling flat works well for organizing multiple pots.
Water gently until the soil is evenly moist but not waterlogged. Place the pots in a warm spot with indirect light for 4-6 weeks while the seeds germinate. You’ll know they’re ready when the first green shoots push through the soil. Keep the soil consistently moist during this phase—never let it dry out completely.
⏰ Step 4: Transition to Bright Light and Gradual Hardening
Once seedlings reach 2-3 inches tall, move them to a bright, sunny window or under a grow light for 12-14 hours of light daily. Blackberry lilies thrive in full sun, so this step ensures strong, sturdy growth. Rotate the pots occasionally so the plants grow evenly and don’t lean toward the light.
After 2 weeks of strong growth, begin hardening them off by placing them outdoors in a sheltered spot for 1-2 hours daily. Gradually increase their outdoor time over 10-14 days, protecting them from direct wind and harsh sun. This prepares them for transplanting into the garden once all frost risk has passed.
🌿 Step 5: Transplant and Maintain for Vibrant Blooms
Transplant the seedlings into the garden once they’ve developed 4-5 true leaves and nighttime temperatures stay above 50°F. Choose a spot with partial shade to full sun and well-draining soil. Space plants 12-18 inches apart to allow room for their rhizomes to spread. Water deeply after transplanting to help them establish roots.
Blackberry lilies are low-maintenance once established. Keep the soil consistently moist but not waterlogged, especially during their first growing season. In late fall, reduce watering and allow the foliage to die back naturally. The rhizomes will store energy for next year’s spectacular blooms.
Tips & tricks for perfect blackberry lily seed germination
These little-known strategies will help you achieve the strongest possible sprouts from your cold-stressed blackberry lily seeds.
Harvest Timing is Critical: The 3-5 day drying period for seed pods is non-negotiable—this prevents premature germination and mold growth. I harvest pods when they're just beginning to split naturally, which usually occurs in late summer when daytime temperatures start dropping. If your pods are still green or haven't begun splitting, they need more time on the plant to mature properly.
Stratification Environment Matters: While the 6-8 week refrigerator period is essential, the crisper drawer isn't just about temperature—it's also about humidity control. The damp paper towel should stay consistently moist but never soggy; condensation inside the bag will create anaerobic conditions that can kill seeds. I like to use a small plastic container with a lid instead of a bag for better airflow while maintaining moisture.
Soil Mix Secrets: The 50/50 blend of potting soil and perlite isn't just about drainage—it's about creating the perfect air-to-moisture ratio for those tiny seeds. I've found that adding a handful of coarse sand (not fine) actually improves drainage even more than perlite alone. For best results, sterilize your soil mix by baking it at 200°F for 30 minutes before planting to eliminate any potential pathogens.
Light Transition Strategy: The move from indirect to direct light (12-14 hours) should happen gradually over 3-4 days to prevent shock. I start by moving pots to the brightest window first, then gradually increase exposure. For indoor growers without sunny windows, a simple LED grow light on a timer works perfectly—just position it 6-8 inches above the seedlings and keep it running for the full 12-14 hours daily.
Pro Tips for Blackberry Lily Seed Pods
- These little-known strategies will help you achieve the strongest possible sprouts from your cold-stressed blackberry...
- Harvest Timing is Critical: The 3-5 day drying period for seed pods is non-negotiable—this prevents premature germina...
- Stratification Environment Matters: While the 6-8 week refrigerator period is essential, the crisper drawer isn't jus...
Frequently asked questions
Got questions about blackberry lily seed pods?
You’re not alone! Here are answers to the most common queries—from germination tricks to troubleshooting—so you can grow these stunning blooms like a pro.
Why do blackberry lily seeds need cold stratification?
Cold stratification mimics winter’s natural dormancy period, breaking seed dormancy and boosting germination rates. Without it, seeds may stay stubbornly dormant for months—or never sprout! For blackberry lilies, 4–8 weeks in the fridge (or outdoors in a cold climate) is key. Think of it as a reset button for your seeds.
How long does it take for blackberry lily seed pods to germinate?
Patience is a virtue! With proper cold stratification, expect germination in 4–12 weeks after sowing. Some seeds may take longer, especially if moisture or warmth fluctuates. Keep the soil consistently damp (not soggy) and avoid moving pots—consistency is your best friend.
Can I collect and save blackberry lily seed pods for next year?
Harvest mature pods (they’ll turn brown and papery) once they’ve dried on the plant. Store them in a cool, dry place (like a paper envelope) until spring. Just don’t refrigerate them—wait until sowing season to stratify fresh. Pro tip: Label your pods to track varieties!
What if my blackberry lily seeds won’t germinate?
Don’t panic! Try these fixes:
- Check stratification: Ensure seeds got 4–6 weeks in the fridge (or a cold frame).
- Test moisture: Seeds need consistent dampness—not bone-dry or waterlogged soil.
- Scarify stubborn seeds: Gently nick the seed coat with sandpaper to help water penetrate.
- Be patient: Some seeds take up to 6 months—don’t give up too soon!
Are there alternatives to growing from seed pods?
Yes! If seeds seem too finicky, consider:
- Dividing mature plants: Dig up clumps in early spring or fall and replant sections.
- Buying tubers: Nurseries often sell blackberry lily tubers for instant blooms (just plant in fall!).
- Layering: Propagate from existing plants by burying stems partially in soil.
Wrapping up and next steps
Growing blackberry lilies from seed pods is a rewarding journey that combines patience with the joy of nurturing life from scratch. By following the cold-stratification method, you’ve unlocked a reliable way to coax vibrant blooms from these resilient seeds—proving that even winter can work in your garden’s favor! 🌱❄️
Now that you’re armed with the right techniques, why not expand your garden’s diversity? Try experimenting with different seed varieties or share your newfound knowledge with fellow plant enthusiasts. Every seed pod holds the potential for a stunning display—so get planting, and watch your garden flourish! 🌸