
Lawn
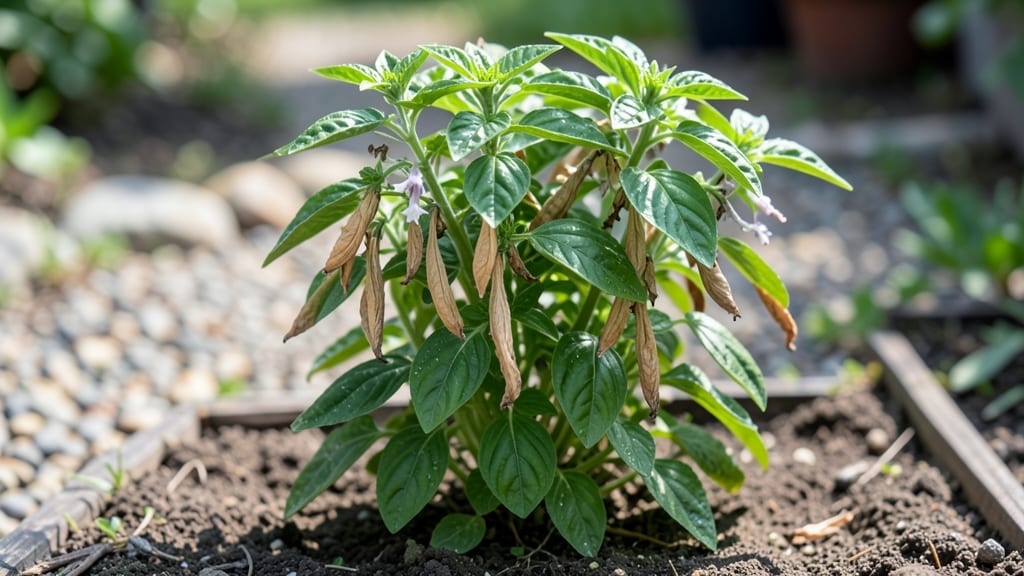
Harvesting basil seed pods is like unlocking a free pass to next year's garden—no store-bought seeds required. 🌱 I learned this trick after my basil plants bolted last summer, and those tiny pods held the secret to growing my favorite varieties again.
The process is simpler than you'd think, and you'll end up with seeds that outperform anything you can buy.
Timing is everything: wait until the pods turn brown and brittle, usually in late summer or early fall. You'll need just a few supplies—a pair of scissors, a paper bag, and a dry spot to stash them.
Once the pods are ready, a gentle twist or snip is all it takes to collect them without wasting a single seed.
Store the dried pods in an envelope or jar until spring, and you'll have fresh basil seedlings ready to go. The seeds stay viable for years, so you're not just saving money—you're preserving your garden's unique flavors and characteristics.
Plus, you can compost any leftover pods or use them in homemade potpourri for a fragrant touch.
This method works for any basil variety, whether you're growing sweet basil, Thai basil, or even the purple-leafed types. It's a zero-waste way to keep your garden thriving year after year, and you'll never have to worry about store-bought seeds again.
📚 In This Guide
- What you need
- Instructions
- Tips and common mistakes
- Wrapping up and next steps
What you need
- ● Fresh basil plants: 3–5 mature plants (preferably Ocimum basilicum varieties like Genovese or Thai basil). ✅ Pro Tip: Ensure plants are fully bloomed with seed pods forming for best results!
- ● Pruning shears or sharp scissors: 1 pair (sterilized to avoid plant disease).
- ● Paper bags or brown lunch bags: 3–5 (1 per plant or pod cluster). ✅ Why? Paper bags allow airflow while preventing moisture buildup.
- ● Rubbing alcohol (70% isopropyl) or bleach solution: Small bottle (for sanitizing tools).
- ● Labeling tags or masking tape + marker: 1 set (to track basil varieties and harvest dates).
- ● Drying surface: Clean, dry tray or screen (e.g., a wire cooling rack or cardboard).
- ○ Small mesh bags or envelopes: 3–5 (for long-term seed storage, optional but recommended).
- ● Glove: 1 pair (to protect hands from prickly stems or sap).
- ● Fine-mesh sieve: 1 (for separating seeds from chaff post-drying).
- ● Humidity pack (silica gel): Small packet (for storing seeds in airtight containers).
- ● Notebook or app: For logging seed viability, harvest dates, and plant traits.
- ● Dry, well-ventilated space: Warm (70–80°F) and humidity-free for drying pods (e.g., a sunny windowsill or garage).
- ● Patience: Seed pods need 2–4 weeks to fully dry indoors.
Step-by-Step instructions for harvesting basil seed pods
Here's how to save seeds from your basil plants without stress or waste—just follow these simple steps.
🌿 Step 1: Identify and Select Healthy Basil Plants
Choose basil plants that have thrived all season with no signs of disease or pest damage. Look for plants with at least 10-12 leaves and several flower stems—these are mature enough to produce seed pods. Avoid plants that bolted early (suddenly grew tall and flowered) unless you want to save those seeds, as they may not produce true-to-type plants.
Pick plants that show light purple or white flowers transitioning into tiny green seed pods. These are the ones ready for seed collection. If your basil is still flowering but hasn't formed pods, give it another 10-14 days before harvesting.
🌱 Step 2: Harvest Seed Pods at the Right Stage
The key to successful seed saving is timing. Wait until the seed pods turn brown and papery but haven't split open yet. If you harvest too early, the seeds won't be fully mature. If you wait too long, the pods will crack open, scattering seeds everywhere.
Gently pinch off the seed pods with your fingers or use clean scissors. Place them in a paper bag (not plastic) to allow airflow. Label the bag with the basil variety and date—this helps track which seeds you've saved. Store the pods in a cool, dry place (like a pantry) for 2-3 weeks to fully dry.
⏰ Step 3: Process and Store the Seeds
After drying, open the seed pods and shake them gently over a clean sheet of white paper to separate the seeds from the chaff. Basil seeds are tiny and dark—you'll see them scattered on the paper. Use a fine-mesh strainer or your fingers to remove any remaining debris.
Transfer the clean seeds to a small envelope or airtight container. Store them in a dark, cool place (like a refrigerator) where they'll stay viable for up to 5 years. Label the container with the variety name and harvest date—this ensures you can replant the same basil next season.
💧 Step 4: Encourage More Seed Pods (Optional)
If your basil plants still have healthy leaves after harvesting some pods, you can encourage more seed production. Simply prune back the plant by cutting just above a set of leaves. This stimulates new growth and may lead to a second round of flowers and seed pods.
Keep the plant well-watered but avoid overwatering—soil should stay lightly moist but not soggy. Place it in a spot with full sun (6+ hours daily) to support flowering. With proper care, you might get another harvest of seed pods in 4-6 weeks.
Tips & tricks for perfect basil seed pod harvesting
Here's what nobody tells you about turning your basil into seeds without the frustration.
Timing is Everything: In Step 2, when you're waiting for those brown and papery seed pods, check them daily after the 10-14 day window mentioned in Step 1. Early morning harvests work best because dew can make pods stick together—wait until they're completely dry. I've learned this the hard way after trying to harvest damp pods that just turned to mush in my bag.
Storage Wisdom: For the 2-3 week drying period in Step 2, I recommend using a mesh produce bag instead of just any paper bag. The mesh allows better airflow while still keeping out pests. Place the bag in a spot with indirect sunlight—direct sun can overheat the pods and reduce seed viability. Trust me on this: I once left mine in direct sun and ended up with brittle, unusable seeds.
Processing Hack: When shaking seeds onto paper in Step 3, lay the paper on a tray or baking sheet first. This catches any stray seeds that might flutter away during the shaking process. After separating seeds from chaff, I like to use a small funnel to transfer them directly into my storage envelope—it's less messy than pouring, and you won't lose any precious seeds in the process.
Encouraging Second Harvests: If you're trying to get another round of seed pods as mentioned in Step 4, be patient with the 4-6 week timeline. I've found that giving the plant a light fertilizer application (like a diluted fish emulsion) after pruning can help jumpstart new growth. Just don't overdo it—too much nitrogen will encourage leafy growth at the expense of flowers and seed pods.
Pro Tips for Basil Seed Pods
- Here's what nobody tells you about turning your basil into seeds without the frustration.
- Timing is Everything: In Step 2, when you're waiting for those brown and papery seed pods, check them daily after the 10-14 day window mentioned in Step 1.
- Storage Wisdom: For the 2-3 week drying period in Step 2, I recommend using a mesh produce bag instead of just any paper bag.
Frequently asked questions
Got questions about harvesting and saving basil seed pods?
You’re not alone! Here are some of the most common queries—plus quick, no-fuss answers to keep your zero-waste journey on track.
When are basil seed pods ready to harvest?
Basil seed pods typically mature 8–12 weeks after planting, once they turn brown and papery (not green!). If left on the plant, they’ll eventually split open—so harvest them before they release seeds naturally. Pro tip: Pick pods on a dry day to avoid mold.
What if my basil flowers but never produces seed pods?
Don’t panic! Basil may skip pod formation if it’s over-fertilized, stressed by heat/cold, or pruned too aggressively. Try these fixes:
- Move plants to partial shade if temps exceed 85°F.
- Reduce nitrogen-heavy fertilizers (switch to balanced 10-10-10).
- Let a few flowers bloom—prune only after pods form.
How do I store basil seed pods for next year?
Store pods in a cool, dry place (like a paper envelope or jar) for up to 1 year. For best viability:
- Let pods fully dry (2–3 weeks) before storing.
- Avoid plastic bags (traps moisture = mold risk).
- Label with the harvest year!
Can I use basil seed pods in cooking before they’re fully dry?
Yes! While fresh, green pods are edible (mildly sweet, like basil leaves), they’re best used in raw dishes (salads, garnishes) or lightly cooked (stir-fries). Once pods turn brown, they’re too tough to eat—save them for seeds. Fun fact: Some cultures use young pods like capers!
What’s the easiest way to extract seeds from pods?
Crush dried pods between two paper towels or roll a pin over them to release seeds. For bulk harvesting:
- Place pods in a ziplock bag and shake vigorously.
- Waft away chaff with a fan or hairdryer (seeds are heavier).
- Store seeds in a dark jar for planting.
Wrapping up and next steps
Harvesting basil seed pods is a simple, rewarding way to embrace zero-waste gardening while enjoying fresh flavors year after year. With just a few tools and a little patience, you can turn your basil plants into a sustainable seed-saving powerhouse—no stress, no fuss! 🌱✨
Ready to put your new skills to the test? Start by selecting a few healthy basil plants in your garden or balcony, and give seed-saving a try. Who knows? You might just discover a new favorite way to grow and share your homegrown bounty!