
Lawn
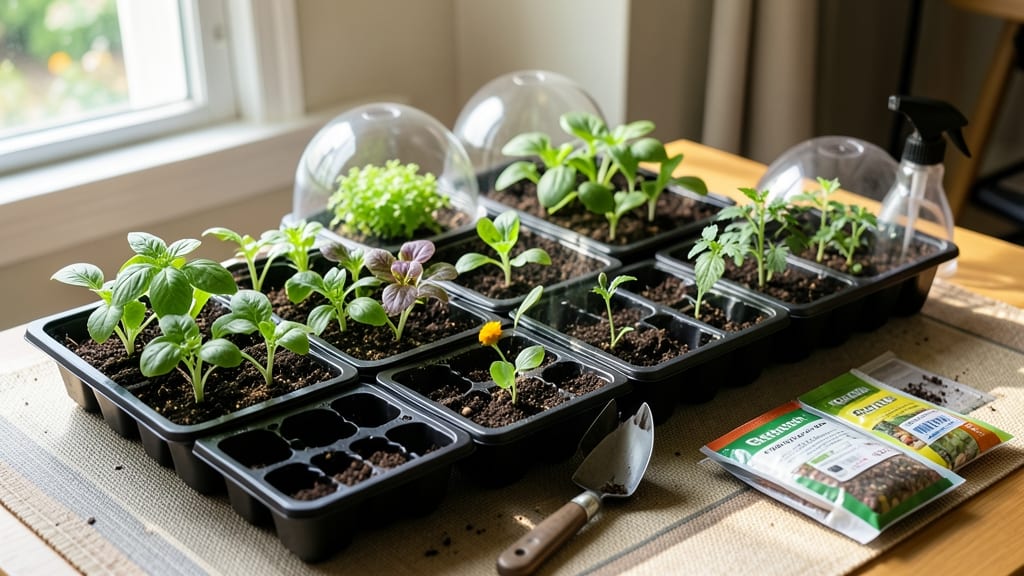
Your first seed starter kit could be the easiest way to grow flowers that’ll steal the show this summer. 🌸 I’ve used these kits for years, and they’ve turned my black thumb into someone who actually gets blooms—no gardening degree required.
The magic is in the setup: trays with drainage, pre-mixed soil that’s not too heavy, and seeds that germinate reliably.
Most kits include everything you need, and you’ll have sturdy seedlings ready for the garden in 60 days—no guesswork about sunlight or soil pH. What you’ll end up with are vibrant, healthy plants that outperform store-bought seedlings.
The right kit even helps you avoid common pitfalls like damping-off (a fungal nightmare) and overwatering. Whether you’re growing sunflowers or petunias, these kits make the process foolproof—and the results are worth the small investment.
📚 In This Guide
- What you need
- Instructions
- Tips and common mistakes
- Wrapping up and next steps
What you need
- ● Seed starter kit (includes seed trays, soil, and seeds—check for beginner-friendly options like herbs, lettuce, or marigolds).
- ● Organic potting mix (1–2 gallons, ensure it’s sterile and well-draining).
- ● Seed trays or containers (6–12 cell trays or small pots with drainage holes).
- ● Watering can or spray bottle (with a fine mist setting to avoid disturbing seeds).
- ● Grow lights or sunny windowsill (6–8 hours of light daily, ideally 6,000–7,000 lumens).
- ● Plastic wrap or humidity dome (to retain moisture during germination).
- ● Plant labels (to track seed varieties).
- ● Heating mat (for cold climates, speeds up germination).
- ● Fertilizer (balanced, water-soluble, like 10-10-10).
- ● Tweezers or small spoon (for delicate seed handling).
- ● Notebook (to log planting dates and progress!).
Step-by-step instructions for using seed starter kits
Here’s how to transform a beginner-friendly kit into lush, transplant-ready blooms in just 60 days—no green thumb required.
🌱 Step 1: Assemble and Prepare the Kit
Start by unpacking your kit and identifying its components: the seed-starting tray, clear dome or plastic wrap, and pre-filled soil cells or pots. Most kits include a planting guide with seed varieties and spacing instructions—read it now to avoid overcrowding. I always double-check the seed packet for specific light and temperature needs, as some annuals like petunias germinate best at 70-75°F, while others, like snapdragons, prefer cooler 60-65°F.
Place the tray on a stable surface and gently press the soil cells to firm them up. The goal is to create a snug fit for seeds so they don’t wash away during watering. If your kit includes a dome or plastic wrap, set it aside for now—it’ll be critical later, but premature use traps too much moisture and risks damping-off. Instead, mist the soil surface lightly with water until it’s evenly damp but not soggy. You’ll know it’s ready when a drop of water beads up on the surface for a few seconds before absorbing.
🌱 Step 2: Sow Seeds at the Correct Depth and Spacing
Refer to the kit’s instructions or seed packet for exact spacing—most annuals need ¼ to ½ inch between seeds in each cell. Use a pencil or the included planting tool to make small holes just deep enough to cover the seeds lightly. I tap the seed packet gently to release one seed at a time, placing it directly into the hole. Sowing too many seeds in a single cell leads to weak, crowded seedlings that compete for nutrients.
Cover the seeds with a thin layer of soil, no deeper than twice the seed’s diameter. Press lightly to ensure good seed-to-soil contact, which helps with moisture absorption and germination. Label each cell with the seed variety and date using a waterproof marker—trust me, you’ll forget which is which after a week of identical green sprouts. Once all seeds are planted, mist the surface again until the soil looks uniformly damp.
💧 Step 3: Create a Humid, Warm Environment for Germination
This is where the clear dome or plastic wrap comes into play. Place it over the tray and secure it loosely—you want to trap warmth and humidity without suffocating the seeds. Position the tray in a warm spot, ideally 70-75°F, like on top of a refrigerator or near a sunny window. Most seeds will germinate within 7-14 days, but some, like sweet alyssum, can sprout in just 5-7 days.
Check the tray daily for condensation on the dome. If it’s foggy inside, the humidity is perfect. If it’s dry, mist the soil lightly and reseal. Avoid lifting the dome to peek—each time you do, you release moisture and cool the soil, slowing germination. Once 50% of seeds have sprouted, remove the dome immediately. Leaving it on too long creates a Petri dish effect, inviting fungal diseases that can kill seedlings overnight.
☀️ Step 4: Provide Optimal Light and Airflow
As soon as seedlings emerge, move the tray to a bright location with 12-14 hours of indirect light daily. A south-facing window works, but if your seedlings stretch toward the light (a sign of legginess), they need more intensity. Supplement with a grow light positioned 2-4 inches above the tray, raising it as the seedlings grow to maintain that distance. Leggy seedlings have thin, pale stems and leaves spaced far apart—this is a red flag that they’re reaching for light.
Now’s the time to introduce airflow. Place a small fan on a low setting near the tray to strengthen stems and prevent damping-off. You’ll see seedlings grow stockier and greener within a few days. Water from the bottom by placing the tray in ½ inch of water for 10-15 minutes, then drain excess. This method ensures even moisture without disturbing delicate roots or causing soil compaction.
⏰ Step 5: Thin and Harden Off for Transplanting
When seedlings develop 2-3 sets of true leaves (the first leaves are cotyledons, not true foliage), it’s time to thin. Use scissors to snip the weakest seedling at soil level, leaving the strongest one in each cell. This might seem harsh, but crowded seedlings compete for resources and produce weaker plants. After thinning, reduce watering slightly—overwatering now can lead to root rot.
Two weeks before your last frost date, start hardening off the seedlings. Place them outside in a sheltered, shaded spot for 1-2 hours the first day, gradually increasing time by 1 hour daily over 10-14 days. This acclimates them to wind, sun, and temperature fluctuations. On the final day, leave them out all day if temperatures stay above 50°F. You’ll know they’re ready when they bounce back from a full day outside without wilting. Transplant on an overcast afternoon to reduce stress, and water deeply at the base to encourage root growth.
Tips & tricks for perfect seed starter blooms
Here's what nobody tells you about transforming those tiny seeds into thriving plants—these are the details that turn good results into great ones.
Germination Temperature: The ideal 70-75°F range for most seeds is critical, but don't panic if your home runs cooler. Place the tray on top of your refrigerator (not inside) or use a seedling heat mat set to 70°F for consistent warmth. For cooler-loving seeds like snapdragons (60-65°F), move the tray to a slightly cooler spot like a windowsill away from direct heat sources. A simple thermometer placed near the tray helps monitor conditions—this small investment prevents wasted seeds.
The Light Factor: That 12-14 hours of light requirement is non-negotiable for healthy seedlings. If your windowsill isn't cutting it, invest in a basic LED grow light—even a 15-watt bulb on a timer works wonders. Position it 2-4 inches above the seedlings and adjust as they grow. Watch for leggy seedlings (those stretching toward light) as your first warning sign—they're telling you they need more intensity. Rotate the tray daily so all seedlings get equal exposure, preventing them from leaning toward one side.
Dome Management: The clear dome creates the perfect humid environment, but timing is everything. Keep it on until 50% of seeds sprout, then remove it immediately to prevent fungal diseases. If condensation forms on the inside, that's perfect—if it's dry, mist the soil lightly and reseal. Pro tip: Place a small piece of cardboard under the tray to catch any water that might drip off, keeping your workspace clean and preventing mold growth. This simple step makes all the difference in preventing damping-off disease that can wipe out seedlings overnight.
Hardening Off Strategy: The gradual 10-14 day hardening process is where most beginners rush and regret it. Start with just 1-2 hours on day one in a sheltered spot, then increase by 1 hour daily. Use a small shade cloth if your seedlings look stressed—even partial shade helps. I've seen gardeners skip this step entirely and end up with wilted, shocked plants that never recover. The key is consistency: if you miss a day or two, don't panic—just pick up where you left off. Your plants will thank you when they thrive in the garden instead of wilting immediately after transplanting.
Pro Tips for Seed Starter Kits
- Here's what nobody tells you about transforming those tiny seeds into thriving plants—these are the details that turn...
- Germination Temperature: The ideal 70-75°F range for most seeds is critical, but don't panic if your home runs cooler...
- The Light Factor: That 12-14 hours of light requirement is non-negotiable for healthy seedlings. If your windowsill i...
Frequently asked questions
Got questions?
Here’s what beginners (and even seasoned gardeners!) often wonder about seed starter kits—plus quick, no-fluff answers to get you growing with confidence.
What’s the best time to start seeds with a kit?
Timing depends on your plants! Check the kit’s instructions or seed packet for days to maturity—then count backward from your last frost date (find it online for your ZIP code). Most veggies (like tomatoes or peppers) need 6–8 weeks indoors before transplanting. Pro tip: Use a seed-starting calendar to avoid rushing seedlings!
How long until I see sprouts?
Sprouting time varies by plant: fast growers (radishes, lettuce) pop up in 3–7 days, while slowpokes (roses, herbs) may take 10–21 days. Keep soil moist (not soggy), warm (70–75°F), and in bright, indirect light—patience pays off! If nothing sprouts after 2 weeks, gently check for seeds (some need light to germinate).
Are seed starter kits worth it for beginners?
Kits include everything you need—seeds, soil, trays, and often labels—plus clear instructions to skip the guesswork. They’re pricier than DIY setups but reduce waste (no dead seedlings!) and boost success rates. For $20–$50, you’ll grow confidence and maybe a few edible blooms. Try a mini kit (like herbs or microgreens) first!
What if my seedlings look leggy or weak?
Leggy seedlings = not enough light! Move them 2–3 inches closer to a south-facing window or use a grow light (12–16 hours/day). If they’re top-heavy, bury the stem deeper when transplanting—roots will form along the buried part. Overwatering can also weaken them; let soil dry slightly between waterings.
Can I reuse seed starter trays or soil?
Yes! Plastic trays can be sanitized with 10% bleach water (rinse well) and reused for years. Soil is trickier—sterilize it by baking at 200°F for 30 minutes or replace it yearly to avoid disease. Save space by flattening empty trays until next season!
What’s a good alternative if I don’t have a kit?
No kit? No problem! Use recycled containers (egg cartons, yogurt cups) with drainage holes and potting mix. DIY kits work for fast crops like beans or zucchini. For herbs, try water propagation (basil roots in a glass of water!). Just keep it simple—even a paper towel + Ziploc can sprout seeds!
Wrapping up and next steps
Starting your gardening journey with a seed starter kit is a rewarding way to grow vibrant blooms in just 60 days! These kits simplify the process, ensuring you have everything you need to nurture your plants from seed to seedling with confidence.
Whether you're a first-timer or looking to expand your green thumb, the key is consistency—water, light, and patience will yield beautiful results.
Now that you’re armed with knowledge, take the next step! Pick your favorite kit, set up your growing space, and watch your garden flourish. Happy planting—your future garden awaits! 🌱✨