
Lawn
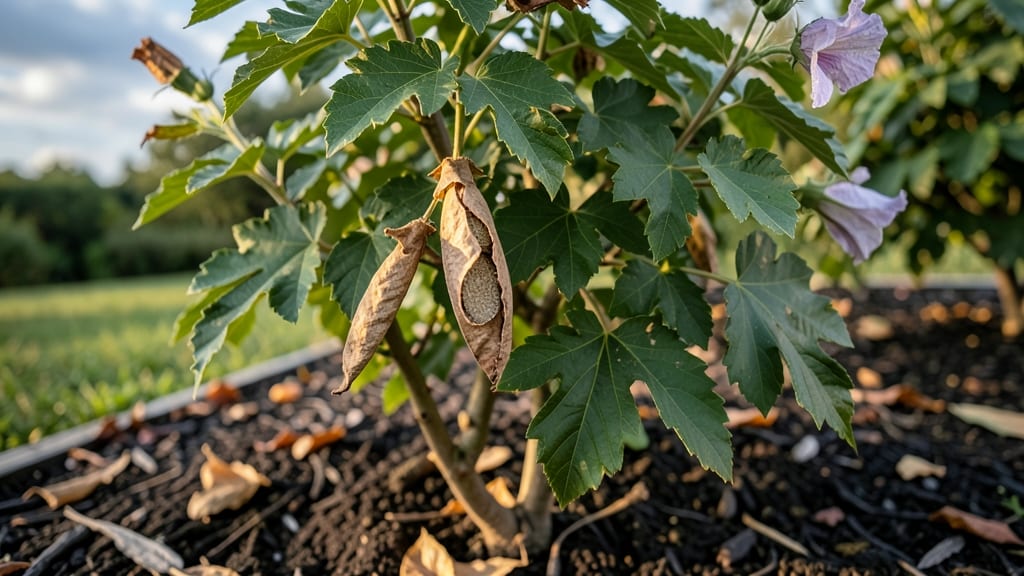
Those rose of Sharon seed pod pictures of the papery, star-shaped pods hold the key to growing new plants for free. 🌿 I’ve harvested dozens over the years, and once you see them at the right stage, it’s impossible to ignore—especially when they split open like tiny treasure chests.
The pods start green and firm, then turn brown and papery as they dry, signaling it’s time to collect before the seeds scatter.
Viable seeds are the tiny black beans inside, but don’t rush—wait until the pods are fully dried and starting to crack open. A gentle twist usually releases them, though some stubborn pods need a light tap.
Store the seeds in a paper envelope in a cool, dry place until spring, where they’ll stay fresh for months. Germination isn’t guaranteed, but with patience, you might just grow a whole new shrub from just a handful.
The real magic happens when those seeds sprout—thin, delicate shoots that eventually grow into the same vibrant, fragrant shrubs you love. Harvesting pods is simple, but timing matters: too early, and the seeds won’t be ready; too late, and they’ll blow away.
A quick check every few days in late fall ensures you don’t miss the window.
Once you’ve collected your seeds, the next step is sowing them indoors in early spring. Use a shallow tray with well-draining soil, keep it moist, and place it in a warm spot.
Within weeks, you’ll see tiny green shoots—proof that a little patience pays off with free, homegrown beauty. Perfect for gardeners who love propagating plants the old-fashioned way.
📚 In This Guide
- What you need
- Instructions
- Tips and common mistakes
- Wrapping up and next steps
What you need
- ● Mature Rose of Sharon seed pods: Collect pods that are brown, dry, and slightly papery (avoid green or soft ones—they’re not ready!). Aim for 5–10 pods per plant (more if you’re saving seeds for propagation).
- ● Sharp pruning shears or garden scissors: Bypass pruners (4–6 inch blades) work best to avoid crushing pods. Sterilize with rubbing alcohol before use!
- ● Brown paper bags or breathable mesh bags: 2–3 bags (12x15 inches) to store pods while drying. Poke small holes for airflow if using plastic.
- ● Flat drying tray or cardboard box: A 12x18-inch tray with low sides to prevent pods from rolling away. Line with newspaper for easy cleanup.
- ● Labeling tags & permanent marker: Label bags with the date harvested and plant variety (if applicable).
- ● Small sieve or fine mesh screen: A ¼-inch mesh to separate seeds from chaff during processing.
- ● Paper towels or coffee filters: For spreading seeds to dry completely.
- ● Gloves (nitrile or cotton): Protects hands from prickly pods and sap.
- ● Desiccant packets: Place 1–2 packets in storage bags to absorb excess moisture.
- ● Digital scale: For weighing seeds (helpful if tracking yield for seed-saving records).
- ● Seed envelope or airtight container: For long-term storage (paper envelopes prevent mold; glass jars with silica gel work for years).
- ● Camera or smartphone: Snap close-up pictures of pods/seeds for your collection or reference!
How to harvest Rose of Sharon seed pods for germination
Skip the guesswork—here's how to identify and collect the best seed pods for healthy new plants.
🌿 Step 1: Identify Mature Seed Pods
Wait until late fall or early winter when the pods turn from green to deep brown and begin splitting open naturally. These pods will feel dry and papery to the touch, almost like crinkling paper. Avoid green pods—those won't contain viable seeds.
Look for pods that are 2-3 inches long and have started cracking along their seams. These are the ones to harvest. If you pick them too early, the seeds inside won't be fully developed. I like to check my plants every 3-4 days during this time, as mature pods can open and scatter seeds quickly.
✂️ Step 2: Harvest and Prepare the Pods
Use clean, sharp pruning shears to snip the pods from the stem, leaving about ½ inch of stem attached. This helps prevent damage to the plant and makes handling easier. Place the harvested pods in a paper bag (not plastic—it traps moisture and encourages mold).
Let the pods dry completely in a warm, dry place for 7-10 days. This step is critical—wet pods will rot before you can extract the seeds. I spread mine out on a screen or mesh in a well-ventilated area, turning them occasionally to ensure even drying.
🌱 Step 3: Extract and Clean the Seeds
Once fully dry, gently crush the pods between your hands or use a small hammer to break them open. The seeds will be small, flat, and dark brown, often surrounded by fine chaff. Sift the contents through a fine-mesh sieve to separate seeds from debris.
Discard any seeds that look shriveled, discolored, or damaged. Viable seeds should feel firm and plump. Store them in an airtight container with a damp paper towel (just slightly moist) in a cool, dark place until you're ready to plant. This keeps them fresh for 6-12 months.
💧 Step 4: Stratify Seeds for Better Germination
Rose of Sharon seeds need cold stratification to break dormancy. Mix the seeds with moist sand or perlite in a sealed container, then refrigerate for 6-8 weeks. Check the mix every 2 weeks—it should stay damp but not soggy. This mimics winter conditions and signals the seeds it's time to grow.
After stratification, plant the seeds ¼ inch deep in a well-draining potting mix. Keep the soil consistently moist (not waterlogged) and place the container in a warm, bright spot (around 70°F). Germination can take 4-8 weeks, so be patient. I cover my seed trays with plastic wrap to retain humidity until sprouts appear.
☀️ Step 5: Transplant Seedlings Carefully
Once seedlings develop 2-3 sets of true leaves, they're ready for their first transplant. Choose a sunny spot with well-draining soil—Rose of Sharon thrives in full sun (6+ hours daily). Harden them off gradually by moving them outdoors for 1-2 hours daily over 10-14 days before planting.
Dig a hole twice as wide as the root ball but no deeper. Space seedlings 3-4 feet apart to give them room to grow. Water deeply after planting to settle the soil and encourage root establishment. Mulch around the base with 2-3 inches of organic mulch to retain moisture and suppress weeds.
Tips & tricks for perfect Rose of Sharon seed pod harvesting
Here's what nobody tells you about getting the most from your seed pods—these little details make all the difference.
Timing is Everything: In Step 1, those 3-4 day checks between harvests are crucial because Rose of Sharon pods mature unevenly. I've seen pods ready to harvest while others on the same branch are still green. If you're unsure, gently tap a pod—mature ones will rattle with seeds inside. This simple test saves you from harvesting too early or too late.
Drying Strategy: The 7-10 day drying period in Step 2 is non-negotiable, but here's the secret: spread pods on a mesh screen over a shallow tray of water. The water creates humidity below while keeping pods dry above—this prevents mold while maintaining airflow. Place a fan nearby on low setting to speed up drying without damaging delicate pods.
Seed Selection: When cleaning seeds in Step 3, don't just rely on looks—do the float test. Place seeds in a bowl of water: viable seeds sink, while empty or damaged ones float. This simple trick can double your good seed yield. Store only the firm, plump seeds that passed both visual and float tests.
Stratification Hack: For Step 4's 6-8 week cold treatment, I use a ziplock bag with a damp paper towel and seeds, then place it in the crisper drawer of my fridge. The crisper's humidity helps maintain moisture without checking every two weeks. After stratification, I plant immediately rather than storing seeds—this gives me a head start on the 4-8 week germination window.
Pro Tips for Rose Of Sharon Seed Pod Pictures
- Here's what nobody tells you about getting the most from your seed pods—these little details make all the difference.
- Timing is Everything: In Step 1, those 3-4 day checks between harvests are crucial because Rose of Sharon pods mature...
- Drying Strategy: The 7-10 day drying period in Step 2 is non-negotiable, but here's the secret: spread pods on a mesh...
Frequently asked questions
Got questions about harvesting and saving Rose of Sharon (Hibiscus syriacus) seed pods? You’re not alone! Here are some of the most common queries—plus straightforward answers to keep your gardening game strong.
When is the best time to collect Rose of Sharon seed pods?
The ideal time to harvest seed pods is in late fall or early winter, after the pods turn brown and begin to split open naturally. If you wait too long, the seeds may scatter or lose viability. Aim for October through December in most climates for peak freshness.
How do I know if the seeds inside are still viable?
Viable seeds should be plump, firm, and dark brown. If they’re shriveled, hollow, or moldy, they won’t sprout. For a quick test, drop a few seeds in water: good seeds sink; bad ones float. Store viable seeds in a cool, dry place until planting.
Can I grow a new Rose of Sharon plant from seed, or should I propagate cuttings?
While seeds are possible, they may not produce true-to-type plants (color/shape variations are common). For guaranteed results, root cuttings in spring or buy nursery-grown saplings. Seeds are better for experimenting or if you’re okay with surprises!
What should I do if my seed pods are being eaten by pests?
Common culprits include slugs, beetles, or birds. Use row covers or neem oil spray to deter pests. If pods are already damaged, harvest any intact seeds quickly and store them indoors. Prevention is key—check plants regularly during pod development!
How long do Rose of Sharon seeds stay viable for storage?
Under ideal conditions (cool, dry, dark), seeds can stay viable for 1–2 years. For best results, label and date your seed packets and replant within a year. If storing longer, keep them in an airtight container with a desiccant packet to prevent moisture damage.
Wrapping up and next steps
Harvesting Rose of Sharon seed pods doesn’t have to be a daunting task—with the right timing, tools, and techniques, you can easily collect viable seeds to grow new plants! 🌱 Whether you’re a seasoned gardener or just starting out, these tips ensure a smooth process and help you reap the rewards of your efforts.
Now that you’re equipped with the knowledge, why not give it a try? Grab your gloves, head outdoors, and enjoy the simple joy of nurturing life from seed.
Ready to plant your future blooms? Share your seed pod adventures with fellow gardeners or dive deeper into Rose of Sharon care to keep your garden thriving! 🌸