
Propagation
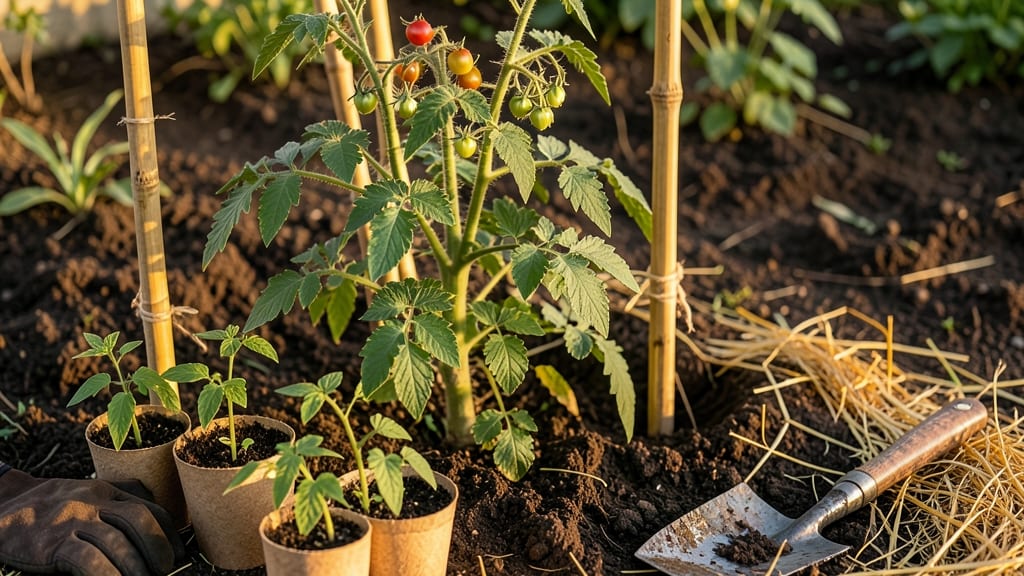
Growing tomatoes from seed outdoors gives you varieties you'll never find at the store—and those first ripe, sun-warmed slices are worth every minute. 🌱 I started with a handful of seeds last spring and ended up with enough tomatoes to share jars with neighbors, all from a patch of soil that cost me nothing but time and a little patience.
The secret isn't complicated: timing, sunlight, and knowing when to let those seedlings toughen up before they meet the garden.
You'll need 60 days of warm weather to go from seed to harvest, so plan your start date based on your last frost (check your zone—most gardeners in Zone 5 start seeds indoors in late March to transplant by late May).
The supplies are simple: seed-starting mix, small pots or trays, a sunny windowsill or grow light, and a sturdy container for transplanting. The real magic happens when those first true leaves appear—it’s the moment you know you’re on the right track.
By mid-summer, you’ll be pinching off suckers and staking your plants, watching as cherry-red fruit swells on the vine. The flavor? Nothing compares to tomatoes you grew yourself, especially when you’ve nurtured them from seed.
Even if you’ve killed plants before, this method is foolproof—as long as you give them enough light and water. This works for heirlooms, beefsteaks, or cherry tomatoes, and scales from a single plant to a full garden bed. Let’s get those seeds in the ground!
📚 In This Guide
- What you need
- Instructions
- Tips and common mistakes
- Wrapping up and next steps
What you need
- ● Tomato seeds: Choose heirloom or hybrid varieties (e.g., Cherry, Beefsteak, or Roma). Buy 1–2 packets (about 10–20 seeds per packet).
- ● Seed-starting mix: 1–2 quarts of sterile, lightweight potting soil (avoid garden soil—it’s too dense!).
- ● Containers: Small pots (2–3 inches wide) or a seed tray with cells. Use 1–2 containers per seed for easy transplanting.
- ● Grow lights or sunny windowsill: A fluorescent or LED grow light (12–16 hours/day) or a south-facing window with 6+ hours of sunlight.
- ● Watering can or spray bottle: A fine-mist sprayer keeps seeds from washing away.
- ○ Plastic wrap or humidity dome: Keeps moisture in until seeds sprout (optional but helpful!).
- ● Larger pots or garden beds: 5-gallon pots or a sunny, well-draining garden spot (6+ hours of sunlight daily).
- ● Fertilizer: A balanced, water-soluble fertilizer (e.g., 10-10-10) or organic options like compost tea.
- ● Stakes or cages: 6-foot tall stakes or tomato cages (5–6 feet tall) for support as plants grow.
- ● Mulch: Straw or shredded leaves to retain moisture and suppress weeds.
- ○ Pruning shears: For trimming suckers (optional but recommended for bushier plants).
- ● pH test kit (ideal soil pH: 6.0–6.8).
- ● Heat mat (70–80°F) for faster germination.
- ● Drip irrigation system for consistent watering.
- ● Row covers to protect seedlings from pests.
Step-by-step instructions for growing tomatoes from seed outdoors
Here’s my foolproof method for turning tiny seeds into robust tomato plants ready for the garden—no fancy equipment needed.
🌱 Step 1: Start Seeds Indoors 6-8 Weeks Before Last Frost
Fill 2-3 inch deep biodegradable pots with sterile seed-starting mix (not garden soil). Press it down lightly so it’s firm but still loose. Plant 1-2 seeds per pot at a depth of ¼ inch, then cover with a thin layer of mix. Mist gently with water until the surface is damp but not soggy.
Place the pots in a warm spot—75-85°F speeds up germination, so a seedling heat mat helps if your home runs cooler. Cover with plastic wrap or a humidity dome to trap warmth and moisture. Check daily for condensation; if it disappears, mist again. You’ll see sprouts in 7-14 days—don’t move them until first true leaves appear (those are the second set after the initial seed leaves).
☀️ Step 2: Provide Bright Light Immediately After Germination
The moment seedlings emerge, move them to a south-facing window or under grow lights for 14-16 hours daily. Without enough light, stems stretch weak and leggy—you’ll spot this as thin, pale growth reaching toward the window. Keep lights 2-4 inches above the plants and raise them as seedlings grow.
Rotate pots a quarter turn daily so plants grow straight, not lopsided. Strong seedlings have deep green leaves and stems thicker than a pencil. If leaves look yellow or wilt, you’re overwatering—let the top inch of soil dry out between waterings.
🪴 Step 3: Harden Off Seedlings 2 Weeks Before Transplanting
Start hardening off by placing pots outside in a shaded, sheltered spot for 1-2 hours the first day. Gradually increase time by 1 hour daily over 10-14 days, ending with full sun exposure. This toughens stems and leaves so they don’t fry when planted outdoors.
Watch for wilting or leaf burn—if you see crispy edges, they’re not ready yet. On the last day, leave them out overnight. Transplant on a cloudy afternoon to reduce shock. Bury stems deeper than usual (up to the first leaves) to encourage strong root growth.
✂️ Step 4: Plant Outdoors and Support for Optimal Growth
Choose a spot with 6-8 hours of full sun and well-draining soil. Space plants 18-24 inches apart in rows 3 feet apart to allow airflow. Press soil firmly around the base but avoid compacting it—roots need room to spread. Water deeply right after planting to settle soil and eliminate air pockets.
Install cages or stakes immediately—tomatoes grow fast, and supporting them early prevents broken stems. Pinch off suckers (the small shoots in leaf axils) to direct energy into fruit production. Mulch with 2-3 inches of straw or grass clippings to retain moisture and suppress weeds.
💧 Step 5: Water and Fertilize for Maximum Yield
Water at the base of plants in the morning to prevent fungal diseases. Keep soil consistently moist but not soggy—let the top inch dry out between waterings. Drip irrigation works best; overhead watering can spread disease. You’ll know you’re doing it right when leaves stay crisp and green, not wilted or yellow.
Fertilize lightly every 2-3 weeks with a balanced organic fertilizer (10-10-10 or similar). Stop fertilizing 4-6 weeks before harvest to let flavors concentrate. Watch for pests like hornworms—handpick them early in the morning when they’re sluggish. With consistent care, you’ll harvest your first tomatoes in 60-70 days.
Tips & tricks for growing tomatoes from seed outdoors
Here's what I learned the hard way after struggling with leggy seedlings and weak plants—these tricks make all the difference.
Germination Conditions: The 75-85°F range is your sweet spot for germination, but if your home stays cooler, a simple seedling heat mat (around $15) works wonders. I've seen germination times cut in half when using one—just place it under your pots before planting. And here's what nobody tells you: if condensation disappears from your humidity dome, mist again immediately. Those seeds need constant moisture to sprout.
Lighting Secret: That 14-16 hours of light isn't just about duration—it's about intensity. If your seedlings start stretching toward the window (a sign of "leggy" growth), you're not providing enough light. I use a basic LED grow light on a timer, but even a sunny south-facing window works if you rotate your pots daily. Watch for stems thinner than a pencil—that's your warning sign.
Harden Off Gradually: The 1-2 hour start time in Step 3 might seem short, but it's crucial. I learned this after transplanting over-hardened seedlings that crisped up in the afternoon sun. Start with just 1 hour on day one, then add 1 hour each day. By day 7, they should handle full sun—if they wilt, they're not ready yet. Pro tip: do this in the morning when temperatures are cooler.
Soil Prep Strategy: Before planting outdoors in Step 4, mix your garden soil with compost (about 1 part compost to 3 parts soil). This improves drainage and adds nutrients. I also recommend burying stems deeper than usual—up to the first leaves—as this encourages stronger root growth. Think of it as giving your plant a head start on stability.
Pro Tips for Grow Tomatoes From Seed Outdoors
- Here's what I learned the hard way after struggling with leggy seedlings and weak plants—these tricks make all the di...
- Germination Conditions: The 75-85°F range is your sweet spot for germination, but if your home stays cooler, a simple...
- Lighting Secret: That 14-16 hours of light isn't just about duration—it's about intensity. If your seedlings start st...
Frequently asked questions
Got questions?
Growing tomatoes from seed outdoors is rewarding, but every gardener hits a snag now and then. Here are answers to the most common People Also Ask queries to keep your sun-kissed harvest on track!
When is the best time to plant tomato seeds outdoors?
Timing depends on your climate! In warm regions (zones 8-10), direct-sow seeds after the last frost when soil is 60°F+. In cooler zones (3-7), start seeds indoors 6-8 weeks before the last frost, then transplant seedlings outdoors 2-3 weeks after the frost date. Check a frost date chart for your area to avoid early chills.
What if my seedlings get frostbitten after transplanting?
Don’t panic! Frost can damage leaves, but the plant often recovers. Remove damaged foliage and protect young plants with frost cloth or row covers for 2-3 nights. Water at the base (not leaves) to prevent further stress. If the stem turns black, the plant may not survive—but healthy roots can sprout new growth!
Can I grow tomatoes in containers or just in the ground?
Tomatoes thrive in containers if they have 5+ gallons of space (bush varieties need less) and proper drainage. Use a lightweight potting mix with compost, and choose a determinate variety (like ‘Patio’ or ‘Tiny Tim’) for smaller pots. Place containers in full sun and fertilize regularly—container-grown tomatoes often produce earlier than ground plants!
Why are my tomato plants wilting even though they have water?
Wilting can signal overwatering, underwatering, or pests. Check the soil: it should be moist but not soggy. If the stems feel soft or hollow, it’s likely blight or root rot—remove the plant and improve drainage. For sudden wilting in hot weather, it’s often aphids or spider mites. Spray with neem oil or introduce ladybugs for natural pest control.
How do I know when my tomato seeds have sprouted?
Sprouts typically emerge in 5-14 days, depending on warmth and moisture. Look for tiny green shoots peeking through the soil—this is your cue to stop misting and reduce humidity. Once seedlings have 2-3 true leaves (not the first “seed leaves”), they’re ready for transplanting or thinning (if crowded). Keep soil moist but avoid overwatering to prevent damping off.
Wrapping up and next steps
Growing tomatoes from seed outdoors is a rewarding journey that connects you to the earth and your kitchen table! With the right sunlight, soil, and care, you’ll enjoy a bountiful harvest in just 60 days—plus the pride of knowing you nurtured every step. 🌱
Ready to take the next step? Start by saving seeds from your best tomatoes this year for next season’s garden. Or, if you’re eager to experiment, try growing heirloom varieties for unique flavors! Happy planting—your future meals are waiting! 🍅✨