
Lawn
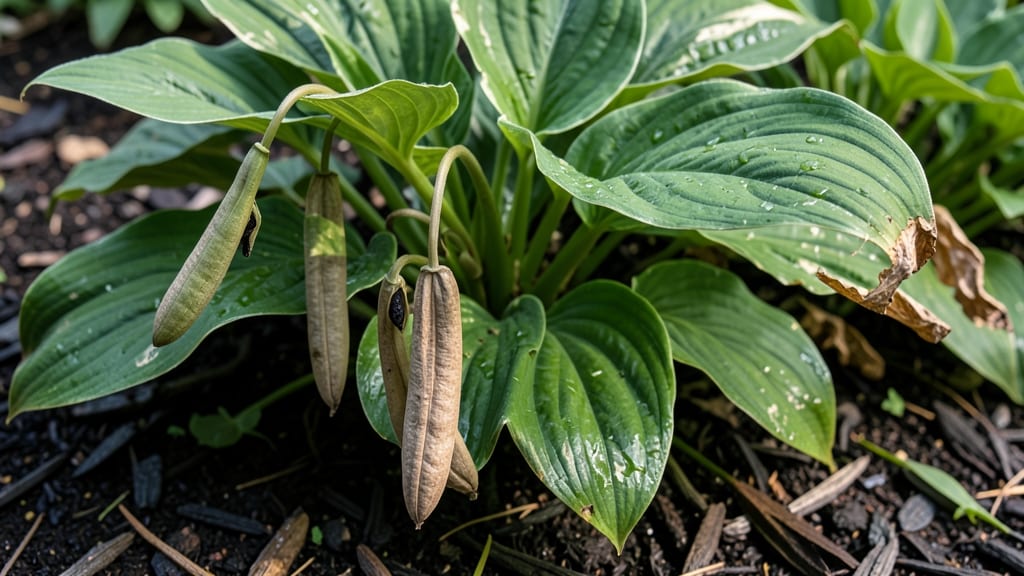
Harvesting hosta seed pods reveals nature's clever way of growing new plants—no digging required. 🌱 The pods turn from green to tan and split open on their own, but there's a trick to catch the seeds before they scatter.
I've collected hundreds this way, and the key is timing everything perfectly.
You'll need just three things: a container for the pods, a fine mesh bag for collecting seeds, and patience—these pods take 3-4 weeks to mature after flowering. The moment they turn brown and crack open, shake them gently over your mesh bag to catch the tiny black seeds inside.
Germination takes longer than divisions but rewards you with unique foliage patterns. Plant seeds in moist potting mix, keep them in bright indirect light, and expect sprouts in 4-8 weeks. The seedlings grow slowly at first, but once established, they'll outpace any hosta you've ever grown.
This method works best in cooler climates where hostas thrive, but even warm-zone gardeners can try it with shade and consistent moisture. The variable results are part of the fun—you might end up with a hosta no one else has!
📚 In This Guide
- What you need
- Instructions
- Tips and common mistakes
- Wrapping up and next steps
What you need
- ● Mature hosta plants with seed pods (ideally in late summer/fall, when pods turn brown and papery).
- ● Pruning shears or sharp scissors (for clean cuts—sterilize with rubbing alcohol first!).
- ● Brown paper bags or breathable mesh bags (1–2 per plant, depending on pod quantity).
- ● Newspaper or cardboard (for drying pods indoors—avoid plastic!).
- ● Rubbing alcohol (70% or higher) (1 small bottle, for sanitizing tools).
- ● Patience! 😉 (Seed pods need 2–4 weeks to fully dry and open naturally.)
- ● Glove (to protect hands from sap or rough pods—gardening gloves work!).
- ● Small paintbrush or toothpick (for gently coaxing stubborn seeds out of pods).
- ● Labeling tags & marker (to track hosta varieties if you’re saving seeds for future planting).
- ● Fan or dehumidifier (if your climate is humid, to speed up drying).
- ● Seed envelope or small jar (for storing seeds once harvested).
How to harvest hosta seed pods without the mess
Skip the waiting game—here's how to coax those stubborn hosta seed pods open naturally.
🌱 Step 1: Wait for Pods to Ripen Fully
Mature hosta seed pods turn from green to a papery tan color—this is your cue they're ready. I check mine weekly after flowering fades, looking for pods that feel dry and papery to the touch. If they still feel firm or green, they need more time.
Don't rush this step. Underripe pods won't open naturally, and forcing them will damage the seeds inside. A good rule of thumb: wait until 70-80% of pods on a plant have turned tan. This usually happens 6-8 weeks after flowering, depending on your climate.
💧 Step 2: Use the Freeze-Thaw Method
Here's the trick I learned from my grandmother: place a handful of dried pods in a sealed plastic bag and refrigerate overnight. The next morning, take them outside and let them sit in direct sunlight for 2-3 hours. The temperature shift causes the pods to crack open naturally.
Check periodically—they'll start popping open like tiny jack-in-the-boxes. If they don't open after one cycle, repeat the process. This method works best when daytime temperatures are 60-75°F. If it's too hot, the pods may dry out completely before opening.
☀️ Step 3: Shake Pods Gently Over Paper
Once pods begin opening, lay a sheet of newspaper or brown paper bag on a flat surface. Hold each pod over the paper and give it a firm but gentle shake. The dried seeds will rain down while the empty pod husks stay behind. I like to do this on a cloudy day—wind can blow seeds everywhere.
Don't worry if some pods resist. Simply place them back in the bag and repeat the freeze-thaw cycle. The seeds inside will remain viable for 1-2 years if stored in a cool, dark place. Label your paper with the hosta variety and harvest date—you'll forget which is which by spring!
✂️ Step 4: Store Seeds Properly
Transfer the collected seeds to an envelope or small paper bag. I add a silica gel packet to keep moisture out—this prevents mold and extends seed viability. Store in a cool, dark place like a seed drawer or refrigerator. Check occasionally for dampness or pests.
Hosta seeds are notoriously slow to germinate, so don't expect immediate results. Plant them in late winter or early spring in a pot with moist seed-starting mix. Keep the soil consistently damp and place in a warm spot until germination, which can take 4-6 weeks or longer.
🌿 Step 5: Prepare for Germination Patience
This is where most gardeners give up—but here's the secret: hosta seeds need cold stratification to break dormancy. After sowing, place the pot in the refrigerator for 4-6 weeks before moving it to light. I wrap the pot in plastic wrap to maintain moisture during this time.
Once you see the first green shoots, move the pot to a bright, indirect light spot. Keep the soil moist but not soggy. Germination rates vary wildly—some years I get 50%, other years only 10%. That's just part of hosta's charm!
Tips & tricks for perfect hosta seed pod harvesting
These little tricks will turn your hosta seed collection from frustrating to foolproof—no more stubborn pods or wasted seeds!
Timing Secret: In Step 1, when you're checking for that papery tan color, run your fingernail along a pod. If it feels like sandpaper and makes a faint scraping sound, it's ready. I've learned this the hard way—waiting for 70-80% of pods to turn tan ensures you don't accidentally harvest underripe seeds that won't germinate. Trust me, those green pods are still working on their timing!
Freeze-Thaw Precision: For the 2-3 hours of sunlight in Step 2, I recommend using a sunny windowsill rather than direct outdoor sun. Indoor light is gentler and prevents the pods from drying out too quickly. Place a small thermometer near the pods to ensure temperatures stay between 60-75°F—this is where the magic happens. If your kitchen runs hot, try a shaded outdoor spot instead.
Shaking Technique: When you shake pods over paper in Step 3, hold them about 6 inches above the surface. This prevents the empty husks from flying everywhere while letting seeds fall cleanly. I've found that tapping the pods gently against a hard surface first loosens the seeds—this makes the shaking process even easier. And always use a dark-colored paper bag or newspaper; lighter colors can make seeds harder to see against the background.
Storage Wisdom: For the 1-2 year viability mentioned in Step 4, I add a small piece of chalk to my seed envelopes along with the silica gel packet. The chalk helps absorb any moisture that might sneak in, giving your seeds that extra protection. Label each envelope with the hosta variety AND the year harvested—you'll thank yourself next spring when you're trying to remember which one was that gorgeous blue-green!
Pro Tips for Hosta Seed Pods
- These little tricks will turn your hosta seed collection from frustrating to foolproof—no more stubborn pods or waste...
- Timing Secret: In Step 1, when you're checking for that papery tan color, run your fingernail along a pod. If it feel...
- Freeze-Thaw Precision: For the 2-3 hours of sunlight in Step 2, I recommend using a sunny windowsill rather than dire...
Frequently asked questions
Got questions about harvesting hosta seed pods? Here are some answers to common concerns—plus a few pro tips to make the process smoother!
When do hosta seed pods ripen and open naturally?
Hosta seed pods typically ripen in late summer to early fall (August–October, depending on your climate). They’ll turn from green to brown and split open on their own when fully dry. If they’re still closed, they’re not ready—patience is key!
How long does it take for hosta pods to dry and split?
Once mature, hosta seed pods usually dry and open within 1–2 weeks in ideal conditions (warm, dry weather). If humidity is high, they may take longer. Speed things up by moving them to a paper bag or dry, shaded spot indoors.
What if my hosta pods won’t open on their own?
Don’t worry—you can gently coax them open! Place dry pods in a paper bag and store them in a cool, dry place (like a closet) for 2–4 weeks. Shake the bag occasionally to encourage them to burst. If they’re still stubborn, squeeze lightly (but avoid crushing seeds!).
Can I collect hosta seeds from unopened pods?
Yes! If pods won’t open naturally, cut them open with clean scissors or snip the tip to release seeds. Just be gentle—hosta seeds are tiny and delicate. Pro tip: Wear gloves to avoid tiny seed dust getting everywhere!
How do I store hosta seeds until planting?
Store seeds in a sealed envelope or airtight container with a damp paper towel (just slightly moist) in the fridge for 4–6 weeks to stratify them. This mimics winter and boosts germination rates. Label your container—hosta seeds are not like tomato seeds!
Wrapping up and next steps
Growing hostas from seed pods is a rewarding journey that blends patience with the joy of nurturing new life! 🌱 With the right tricks—like strategic pruning, natural drying, and gentle encouragement—you’ll soon be harvesting viable seeds to expand your garden or share with fellow plant lovers.
Whether you’re a seasoned gardener or a curious beginner, these techniques make the process stress-free and fun.
Ready to turn those seed pods into thriving hostas? Start small—pick a few mature plants this season, experiment with the methods that work best for you, and watch your garden grow! 🌿 Grab your pruners and get planting!