
Size
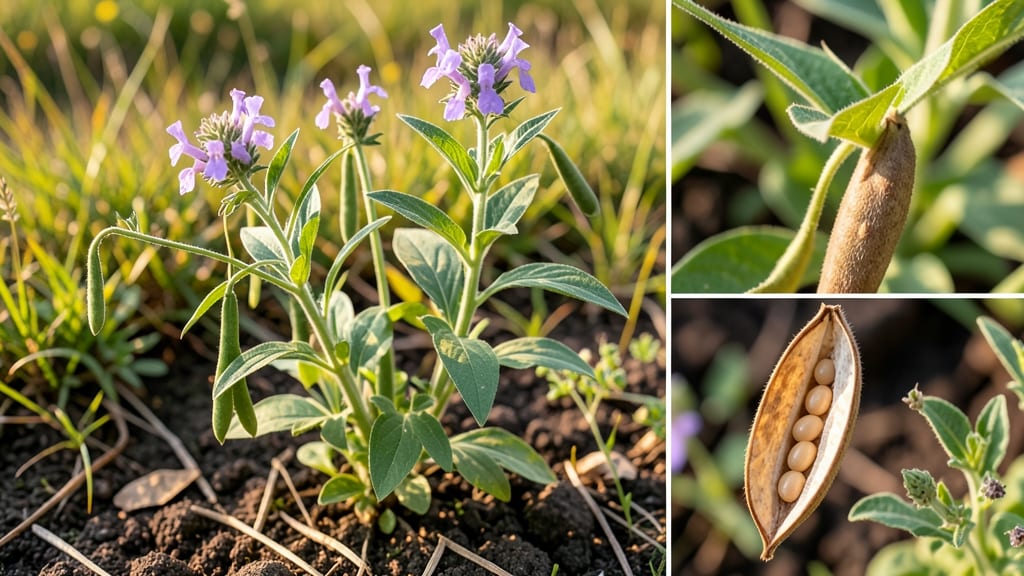
Grow sesame seed plants in just 60 days—no cold stress, no twisted stems. 🌱 I’ve grown sesames for years, and the trick is starting them indoors in warm soil, then transplanting when night temps stay above 60°F. Most gardeners give up when stems twist or flowers bolt early, but this method keeps them sturdy and productive.
The secret lies in well-draining soil mixed with compost and a warm spot (70°F+). Sesames hate soggy roots, so use pots with drainage holes if starting indoors. Once outdoors, space plants 12-18 inches apart in full sun—they’ll bolt fast in heat but need consistent moisture (not soggy soil).
By day 60, you’ll harvest fragrant, nutty seeds straight from the pods. The plants stay compact, avoid the dreaded "twist" problem, and even thrive in small spaces. No fancy equipment—just patience and the right timing.
Works for both containers and garden beds, and the seeds dry perfectly indoors. Here’s how to keep them thriving through the growing season without the usual struggles.
📚 In This Guide
- What you need
- Instructions
- Tips and common mistakes
- Wrapping up and next steps
What you need
- ● Sesame seeds: 1–2 lbs (preferably certified organic or heirloom varieties like Tift-44 or Black Sesame for best results).
- ● Well-draining soil: 5–10 gallons of loamy, slightly acidic soil (pH 6.0–6.5). Mix in compost (1 part compost to 3 parts soil) for nutrients.
- ● Containers or garden bed: For containers: 5–7-inch deep pots (1–2 plants per pot) with drainage holes.
- ● For garden beds: A sunny spot with at least 6–8 hours of sunlight daily and 6+ inches of soil depth.
- ● Watering can or hose: With a gentle spray nozzle to avoid disturbing seedlings.
- ● Fertilizer: Balanced organic fertilizer (10-10-10) or compost tea for a natural boost.
- ○ Plant labels: To track varieties (optional but helpful!).
- ● Garden gloves (to protect your hands from soil and seeds).
- ● Trowel or small shovel (for transplanting seedlings).
- ● Mulch (straw or shredded leaves) to retain moisture and suppress weeds.
- ● Row covers or cloches (if growing in cool climates to protect young plants from frost).
- ● Pruning shears (for trimming dead leaves or leggy growth).
- ● pH test kit (to ensure soil is in the ideal range).
- ● Shade cloth (30–50%) (if your area gets intense afternoon sun during hot months).
Step-by-Step instructions for growing sesame seed plants
Sesame thrives with the right balance of warmth and patience—here’s how to grow it strong and fast.
🌱 Step 1: Start Seeds Indoors at the Right Time
Sesame seeds need warmth to germinate, so begin them indoors 8-10 weeks before your last spring frost. Use biodegradable pots (like peat or paper) filled with sterile seed-starting mix—never garden soil, as it’s too dense. Plant 2-3 seeds per pot at a depth of ¼ inch, just enough to cover them lightly. Press gently so they make contact with the soil but don’t bury them too deep.
Place the pots in a warm spot (around 75-80°F)—a seedling heat mat works wonders if your home runs cooler. Keep the soil moist but not soggy by misting lightly daily. You’ll see sprouts in 5-7 days, but if germination takes longer, don’t panic—sesame seeds can be slow to break through. Once seedlings emerge, remove the weakest one, leaving the strongest per pot.
☀️ Step 2: Provide Warmth and Light for Strong Starts
Sesame seedlings hate cold drafts and need bright light to prevent leggy growth. Move them under grow lights (14-16 hours daily) or to a south-facing window once they’ve sprouted. If leaves stretch toward the light or turn pale, your setup isn’t intense enough—adjust the lights within 2-3 inches of the plants. The goal is bold, dark green leaves with compact spacing between them.
Keep soil consistently moist but avoid overwatering—sesame roots rot easily in soggy conditions. A simple trick: stick your finger ½ inch deep into the soil. If it feels dry, water gently until moisture reaches the bottom of the pot. Once seedlings develop 2-3 true leaves (not just the initial seed leaves), they’re ready to harden off.
🪴 Step 3: Transplant After All Frost Risk Has Passed
Wait until soil temperatures reach at least 70°F before moving sesame outdoors—cold soil stunts growth. Choose a sunny spot with well-draining soil (sesame hates soggy roots). Space plants 12-18 inches apart in rows 24 inches apart to allow airflow and prevent disease. Dig holes twice as wide as the root ball and just as deep, then gently remove the seedling from its pot and place it in the hole.
Fill in around the roots with soil, firming lightly to eliminate air pockets. Water deeply at the base to encourage roots to spread downward. Mulch with 1-2 inches of straw to retain moisture and keep soil warm. Sesame thrives in hot, dry conditions, so once established, water only when the top 1 inch of soil feels dry—overwatering leads to weak stems and poor yields.
⏰ Step 4: Maintain Heat and Watch for Blooms
Sesame plants love heat—they bolt (flower prematurely) if stressed by cold. If nighttime temps drop below 60°F, cover young plants with frost cloth for a few nights until they toughen up. Once established, sesame grows quickly, reaching maturity in 60-70 days. Watch for small white or lavender flowers to appear—this signals the plant is ready for harvest.
To ensure strong blooms, side-dress with compost when plants are half their mature height. This boosts nutrients without overfeeding. Avoid high-nitrogen fertilizers—they promote leafy growth at the expense of flowers. When 50% of flowers open, the seeds are nearly ready. Harvest when the pods turn brown and split open naturally—this ensures maximum flavor and oil content.
Tips & tricks for growing sesame seed plants
Sesame plants reward patience with bold flavors—here’s how to give them the best shot at success.
Warmth is Key: In Step 1, that 75-80°F warmth requirement isn’t just a suggestion—it’s non-negotiable. Sesame seeds won’t germinate well below 70°F. If your home runs cooler, invest in a seedling heat mat or place pots on top of your fridge (not inside). I learned this the hard way after waiting two weeks for seeds that never sprouted—turns out my basement was too chilly!
Lighting Strategy: For Step 2’s 14-16 hours of light, don’t just turn on your grow lights and walk away. Sesame seedlings need that light within 2-3 inches of their leaves. I use a simple trick: place a ruler next to the plants and adjust until the leaves are just touching the 3-inch mark. Too far away? You’ll get tall, leggy plants that flop over.
Transplanting Timing: Step 3’s soil temperature check is crucial—don’t rush it! Use a soil thermometer to confirm 70°F before transplanting. I’ve seen sesame plants wilt dramatically when moved to cold soil, even if daytime temps are warm. If your soil is borderline, wait a few extra days. Better to delay than risk stunted growth from cold stress.
Harvesting Cues: In Step 4, those brown pods that split open naturally are your golden ticket. But don’t wait until they’re completely dry—harvest when they’ve turned tan-brown and are starting to crack. If you wait too long, the seeds may scatter on the ground. I like to harvest in the morning when dew has dried but humidity is still low, making the pods easier to handle.
Pro Tips for Grow Sesame Seed Plant
- Sesame plants reward patience with bold flavors—here’s how to give them the best shot at success.
- Warmth is Key: In Step 1, that 75-80°F warmth requirement isn’t just a suggestion—it’s non-negotiable. Sesame seeds w...
- Lighting Strategy: For Step 2’s 14-16 hours of light, don’t just turn on your grow lights and walk away. Sesame seedl...
Frequently asked questions
Got questions about growing sesame seed plants? You’re not alone! Here are some of the most common concerns—and their straightforward answers—to help you cultivate thriving sesame blooms with ease.
How long does it take for sesame seeds to germinate?
Sesame seeds typically sprout within 7 to 14 days after planting, depending on soil warmth (ideal: 75–85°F). Keep the soil moist but not soggy, and place seeds in a sunny spot or under grow lights. Patience pays off—thin seedlings to 6–12 inches apart once they’re 2–3 inches tall for better airflow and growth!
Can I grow sesame plants indoors?
Yes! Sesame thrives indoors with 6–8 hours of sunlight daily (a sunny windowsill or grow light works). Use a 5–6 inch deep pot with well-draining soil, and keep humidity moderate. Just beware: indoor plants may produce fewer seeds than outdoor varieties. If space is tight, try dwarf sesame varieties like ‘Tif sesame’ for compact growth.
What’s the best temperature for sesame seed plants?
Sesame is a warm-weather crop—it struggles in cold climates. Ideal temps:
- Germination: 75–85°F (24–29°C)
- Growth: 70–90°F (21–32°C)
- Avoid: Below 50°F (10°C) or frost (sesame is not cold-hardy!)
Why are my sesame plants wilting or turning yellow?
Common culprits:
- Underwatering: Sesame needs 1–1.5 inches of water weekly (more in heatwaves). Wilting leaves = thirsty plant!
- Overwatering: Yellowing leaves + mushy stems? You’re drowning them. Let soil dry slightly between waterings.
- Pests: Check for aphids or spider mites (spray with neem oil if spotted).
- Nutrient deficiency: Pale leaves? Feed with a balanced fertilizer (10-10-10) every 4–6 weeks.
How do I know when sesame seeds are ready to harvest?
Harvest sesame seeds when 70–80% of pods turn yellow-brown (usually 60–70 days after planting). Gently twist pods from the stem—don’t pull! Spread them in a dry, shaded area for 1–2 weeks to cure. Once fully dry, rub pods between your hands to release seeds. Store in an airtight container for up to a year!
Still stumped? Drop your sesame-growing woes in the comments—we’re happy to help you troubleshoot!
Wrapping up and next steps
Growing sesame plants is a rewarding journey that delivers nutrient-rich seeds in just 60 days—even in cooler climates! By following these steps—from soil prep to harvesting—you’ll avoid common pitfalls like twist struggles and enjoy a bountiful harvest.
Whether you’re a beginner or seasoned gardener, your patience and care will pay off with golden sesame blooms ready for the table.
Ready to take the next step? Start small—plant a few seeds this season, track your progress, and soon you’ll be sharing your sesame success with friends (or the kitchen!). 🌱✨