
Lawn
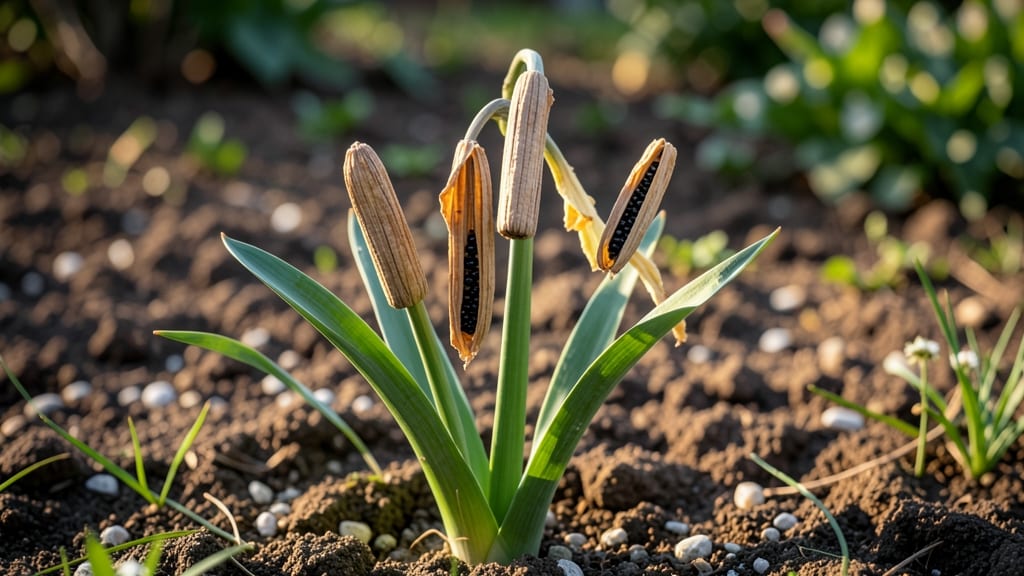
Collecting daffodil seed pods after blooms fade unlocks free plants for years to come. 🌱 The trick is patience—wait until the pods turn brown and papery before harvesting, usually 6-8 weeks after flowering.
My first attempt failed because I picked them too soon, but now I mark the stems with garden flags to track maturity.
Viability drops fast once pods dry, so store them in a cool, dry place until spring planting. Most seeds need cold stratification (60 days in the fridge) to break dormancy—nature’s way of timing germination with winter.
I’ve found that pods from yellow daffodils germinate most reliably, while orange varieties often disappoint.
By spring, you’ll have delicate seedlings that need bright light and careful watering—never soggy soil. They grow slowly at first, but with proper care, you’ll see true leaves in 4-6 weeks. The payoff? A patch of daffodils that multiplies each year without buying new bulbs.
Works best for species daffodils (not hybrids), and patience is key—full blooms take 3-5 years. But the wait transforms bare spots into cheerful spring displays. Here’s how to do it right the first time.
📚 In This Guide
- What you need
- Instructions
- Tips and common mistakes
- Wrapping up and next steps
What you need
- ● Mature daffodil seed pods: Collect only fully ripe pods (brown, papery, and dry) from paperwhite or Jonquil varieties—avoid hybrid daffodils (they won’t produce true seeds). Aim for 5–10 pods per plant.
- ● Sharp pruning shears or scissors: Sterilized tools to snip pods cleanly without damaging stems.
- ● Brown paper bags or breathable mesh bags: 1–2 bags (per 5–10 pods) to store pods in a dry, dark place for 4–6 weeks.
- ● Small plastic containers or egg cartons: For sowing seeds (e.g., 6–12 compartments per container).
- ○ Potting soil: 1–2 bags of seed-starting mix (sterile, well-draining). Optional: Add perlite or vermiculite (10% mix) for extra airflow.
- ● Spray bottle with water: For gentle misting (avoid soaking soil).
- ● Plastic wrap or humidity dome: To create a mini greenhouse effect while seeds germinate.
- ● Garden labels & marker: Label pods/seeds with variety name + date (e.g., “Jonquil – Fall 2024”).
- ● Grow lights: If starting seeds indoors before last frost (not required if sowing outdoors in fall).
- ● Fungicide (e.g., neem oil spray): 1–2 sprays to prevent mold in damp conditions.
- ● Cold frame or outdoor nursery bed: For hardening off seedlings before transplanting.
- ● Gloves: Protect hands from daffodil sap (can irritate skin).
How to harvest and process daffodil seed pods for next year’s garden
Here’s how to turn this year’s spent blooms into next year’s hardy, cold-loving daffodils.
🌱 Step 1: Identify and Select Mature Seed Pods
Wait until the foliage has fully yellowed and died back naturally—this signals the seed pods are fully mature. Look for pods that are dry, papery, and turning brown. I avoid green or plump pods; they’re not ready yet. The best pods are the ones that have split open slightly on their own, revealing the small, flat seeds inside.
Harvest on a dry day when the pods are completely dry to the touch. Use clean, sharp pruners to snip the entire pod from the stem, leaving a small portion attached. This prevents damage to the seed pod itself. Store them in a paper bag in a cool, dry place until you’re ready to process—usually within a few days.
✂️ Step 2: Extract and Clean the Seeds
Once the pods are fully dry, gently squeeze them over a clean sheet of paper or a shallow tray. The seeds will fall out easily, but don’t rush—some pods may need a light tap with a spoon to release all the seeds. Discard any empty pods or debris. You’ll notice the seeds are small, flat, and black or dark brown with a slightly papery texture.
Sift the seeds through a fine mesh strainer to remove any remaining chaff or small debris. Place the clean seeds in a small envelope or jar, labeling it with the daffodil variety and the harvest date. This ensures you don’t accidentally mix varieties or forget which seeds you’ve collected.
🌿 Step 3: Cold-Stratify the Seeds for Germination
Daffodil seeds require a cold period to break dormancy, mimicking winter conditions. Place the seeds in a sealed container with a small amount of damp (not soaking) potting mix or sand. I use a small plastic bag with a zip-top, placing the seeds and mix inside, then sealing it tightly. Store the container in your refrigerator’s crisper drawer for 8-12 weeks at 35-45°F.
Check the seeds occasionally to ensure the mix remains lightly moist—never soggy. After the cold period, transfer the container to a warm, bright spot (around 65-70°F) to encourage germination. This stratification step is critical; without it, seeds may take years to sprout or never germinate at all.
☀️ Step 4: Plant the Stratified Seeds
After stratification, sow the seeds in small pots filled with well-draining potting mix. Plant them ½ inch deep, spacing them about 1 inch apart. Keep the soil lightly moist but not waterlogged, as excessive moisture can cause rot. Place the pots in a bright, indirect light spot—direct sunlight can overheat the small seedlings.
Germination can take 4-8 weeks, so be patient. Once the seedlings emerge, provide bright, indirect light for the first few weeks, then gradually introduce them to full sun over a week or two. This slow acclimation prevents shock and ensures strong, healthy growth.
🪴 Step 5: Transplant and Overwinter Seedlings
After the seedlings develop 2-3 sets of true leaves (not just the initial seed leaves), they’re ready to transplant into individual pots. Use 3-4 inch pots filled with a mix of potting soil and perlite for drainage. Keep them in a cool, shaded spot outdoors or under a grow light indoors during their first growing season.
Here’s the key: Do not transplant them into the garden immediately. Instead, let them grow for one full year in pots, then plant them outdoors in early fall (about 8-10 weeks before your first frost). This mimics their natural growth cycle and ensures they establish strong roots before winter. By next spring, you’ll have hardy, cold-stressed daffodils ready to bloom.
Tips & tricks for perfect daffodil seed pod processing
These insider tricks will help you maximize your daffodil seed harvest and grow next year's hardiest blooms.
Pod Selection Insight: The key to success starts in Step 1—never harvest pods that haven't naturally split open slightly. These self-opening pods contain the most viable seeds. I've learned that pods still attached to the stem are more likely to have fully mature seeds inside. If you must harvest unopened pods, let them dry completely on your counter for an extra 3-5 days before processing to ensure maximum seed development.
Stratification Storage Hack: For the critical 8-12 week cold stratification in Step 3, I recommend using a small plastic container with a tight-sealing lid rather than a bag. This creates a more stable moisture environment and prevents condensation buildup that could lead to mold. Place a small piece of paper towel in the container to help maintain consistent moisture without making the mix soggy. The refrigerator's crisper drawer at 35-45°F provides the ideal temperature range for breaking dormancy.
Germination Light Strategy: When your stratified seeds are ready for Step 4, position your seedling pots within 6-12 inches of a grow light or bright window. Daffodil seedlings are particularly sensitive to temperature fluctuations from direct sunlight, which can cause overheating. I've found that using a simple LED grow light on a timer (14 hours on, 10 hours off) gives the most consistent results. This mimics natural daylight cycles while preventing the heat stress that can occur with southern window exposure.
Transplanting Timing: The one-year pot culture in Step 5 might seem long, but it's worth it. I've seen daffodils planted directly after germination struggle with winter survival. The extra year in pots allows them to develop a robust root system that can handle freezing temperatures. When transplanting in early fall, choose a day when temperatures are consistently above 50°F—this gives the young plants a chance to establish before winter sets in.
Pro Tips for Daffodil Seed Pods
- These insider tricks will help you maximize your daffodil seed harvest and grow next year's hardiest blooms.
- Pod Selection Insight: The key to success starts in Step 1—never harvest pods that haven't naturally split open sligh...
- Stratification Storage Hack: For the critical 8-12 week cold stratification in Step 3, I recommend using a small plas...
Frequently asked questions
When should I harvest daffodil seed pods?
Harvest seed pods when they turn tan or brown and start splitting open (usually 6–8 weeks after blooming). Wait too long, and the seeds may scatter or sprout prematurely. Aim for late summer or early fall for best results.
Why do daffodil seed pods need cold treatment?
Daffodils are cold-stratified plants, meaning they need a winter-like chill (40–50°F for 4–6 weeks) to break dormancy. Without this, seeds may sprout too early or fail entirely. Mimic winter by refrigerating pods in a damp paper towel for 6–8 weeks before planting.
Can I plant daffodil seeds directly in the ground?
Yes! After cold treatment, sow seeds 1–2 inches deep in well-draining soil, 6 inches apart. They’ll take 2–3 years to bloom—patience is key! For faster results, start indoors in pots 6–8 weeks before the last frost.
What if my seed pods don’t open or produce seeds?
No pods? Your daffodils may not be fertile hybrids (many garden varieties are sterile). Try ‘Barbados’ or ‘Tête-à-Tête’—these are seed-producing cultivars. If pods form but stay closed, they might need more sunlight or consistent watering during blooming.
How long do daffodil seeds stay viable?
Fresh seeds germinate best, but they can stay viable for 1–2 years if stored in a cool, dry place (like a sealed container in the fridge). After that, germination rates drop. Label and date your pods to track freshness!
Pro Tip:
Label your seed pods with the daffodil variety and harvest date to track which plants thrive in your climate. Over time, you’ll discover your garden’s best-performing blooms!
Wrapping up and next steps
Harvesting and saving daffodil seed pods is a rewarding way to grow fresh blooms for next season—no replanting required! 🌱 With patience and care, you can turn this year’s spent flowers into next year’s vibrant garden stars.
Whether you’re a seasoned gardener or just starting out, these cold-hardy beauties are a fantastic addition to any yard.
Ready to try it? Grab those seed pods, follow the steps, and watch your garden flourish with new life. Happy planting!