
Propagation
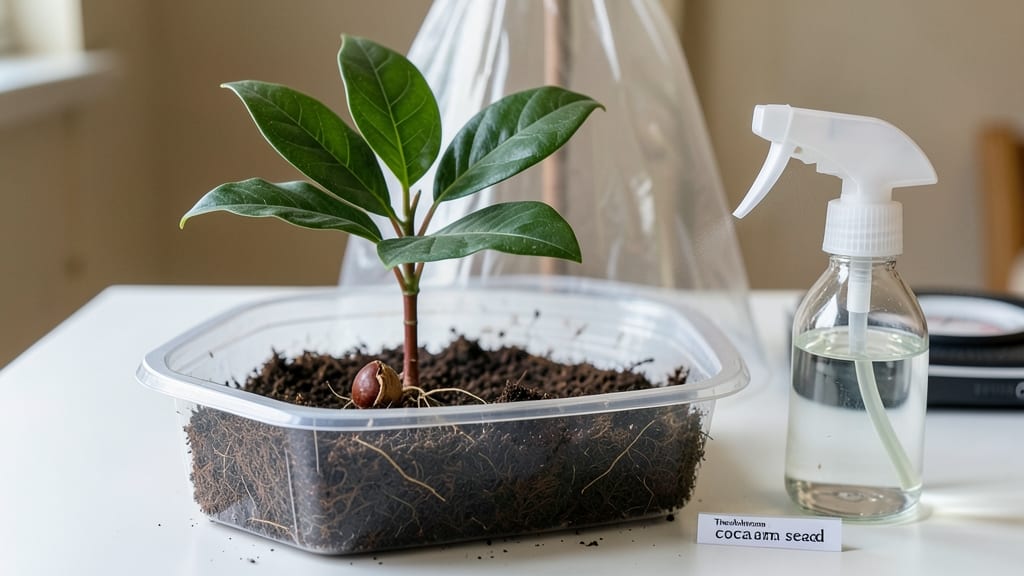
Cocoa seed germination takes 21 days of patience—but the moment those first green sprouts crack through the soil is worth every bit of it. 🌱 I’ve struggled with moldy seeds and slow starts, but this humidity-controlled method actually works, even for beginners. The key? Keeping moisture steady without drowning the seeds while maintaining warm, stable conditions. You’ll need just five simple supplies: fresh cocoa beans (or seeds from store-bought chocolate), a clear plastic container, damp sphagnum moss or peat pellets, a heat mat or warm spot, and a spray bottle. No fancy equipment—just the right balance of warmth and moisture. The trick is mimicking the tropical forest floor where cocoa naturally grows, but in your own space. Once you see those first tiny shoots—usually within 7-14 days—you’ll know you’re on track. The seedlings are delicate at first, so avoid moving them until they’ve developed their first true leaves. That’s when you can transplant them into individual pots with well-draining soil, keeping the humidity high but not soggy. This method works year-round, but if your home runs dry in winter, a humidity dome or plastic wrap over the container helps. The biggest mistake? Letting the moss dry out or overwatering, which causes mold. Stick with it—those sprouts will reward your consistency with strong, healthy seedlings ready for their next growing stage.
📚 In This Guide
- What you need
- Instructions
- Tips and common mistakes
- Wrapping up and next steps
What you need
- ● Fresh cocoa seeds (fermented & dried): 10–20 seeds (preferably from high-quality, heirloom varieties like Forastero or Criollo).
- ● Germination medium: Option 1: Coco coir (100% coco fiber) – 1–2 cubic feet (pre-moistened).
- ● Option 2: Peat moss + perlite mix (3:1 ratio) – 1 cubic foot.
- ● Humidity dome or propagator: 1 large (12"–18" diameter) with clear lid or plastic wrap.
- ● Spray bottle (fine mist): 1 (16 oz, with adjustable nozzle).
- ○ Plastic storage container (optional but helpful): 1 (with lid, 10"–12" deep) for extra humidity control.
- ● Pruning shears or sharp knife: 1 (for seed prep, if needed).
- ● Thermometer/hygrometer: 1 (to monitor 75–85°F (24–29°C) temp and 80–90% humidity).
- ● Small hand trowel: 1 (for planting seeds gently).
- ● Labeling tags: 5–10 (to track seed varieties and planting dates).
- ● Grow lights (LED, full-spectrum): 1 (if natural light is <12 hours/day).
- ● Bottom heat mat: 1 (80–85°F setting) to speed up germination.
- ● Seedling trays with drainage holes: 1–2 (for transplanting after sprouting).
- ● Fungicide (organic, like neem oil): 1 bottle (to prevent mold if humidity spikes).
Step-by-step instructions for germinating cocoa seeds
Here's how to coax those stubborn cocoa seeds into sprouting with patience and precision.
🌱 Step 1: Prepare Seeds for Faster Germination
Cocoa seeds have a tough outer shell that slows sprouting. Soak them in warm water for 24 hours to soften the coating. I use a shallow dish and change the water halfway through—this prevents mold and keeps the water temperature consistent. After soaking, gently rub the seeds between two paper towels to remove any remaining pulp. This step is crucial because it mimics the natural process of fermentation in the wild, which breaks down the seed's protective layer.
Once prepped, place the seeds in a plastic bag with a damp paper towel (not soaked—just damp). Seal the bag loosely and store it in a warm, dark place (around 70-80°F). Check daily for moisture—if the towel feels dry, mist it lightly with water. You'll see tiny cracks or white roots in 3-7 days, signaling it's time to move them to soil.
💧 Step 2: Plant in Humidity-Controlled Conditions
Fill a small pot (about 4 inches deep) with a mix of 50% peat moss and 50% perlite—this lightweight blend prevents rot while holding enough moisture. Plant the pre-sprouted seeds ½ inch deep, spacing them 2 inches apart. I like to use a pencil to make small holes, as cocoa seeds are delicate and can crack easily. Gently press the soil around them to ensure good contact without compacting.
Cover the pot with a clear plastic dome or wrap it in plastic wrap to create a mini greenhouse. Place it in a warm, shaded spot (like a bathroom with a window or under a grow light). The goal is to keep humidity high—70-80%—while maintaining soil moisture. Mist the dome occasionally to prevent condensation buildup, which can suffocate the seeds. You'll know the environment is right when tiny seedlings emerge in 7-14 days.
☀️ Step 3: Transition to Light and Monitor Growth
Once the first true leaves appear (they'll look like small, rounded cocoa plant leaves), remove the plastic cover gradually over 3-5 days to acclimate the seedlings. Place the pot in bright, indirect light—direct sun can scorch tender leaves. I use a grow light on a timer for 12 hours daily if natural light is insufficient. Watch for leggy growth (long, thin stems with sparse leaves)—this means the seedlings need more light or stronger intensity.
Water gently at the base when the top inch of soil feels dry. Avoid wetting the leaves, as cocoa seedlings are prone to fungal issues. In 4-6 weeks, you'll see the first true cocoa leaves (larger and more defined than the initial cotyledons). At this stage, you can transplant seedlings to individual pots if they're crowded, but be gentle—they have delicate root systems.
⏰ Step 4: Maintain Ideal Conditions for Long-Term Success
Cocoa plants thrive in 75-85°F temperatures and high humidity (aim for 60-70%). If your home runs cooler, use a small space heater near the plants (not directly on them) or a humidity tray filled with pebbles and water. Rotate the pot weekly so all sides get even light, preventing lopsided growth. You'll notice stronger stems and darker green leaves as the plants mature—this means they're thriving.
Fertilize lightly every 4-6 weeks with a balanced, water-soluble fertilizer (half-strength) once the seedlings are 3-4 inches tall. Over-fertilizing can burn young roots, so always water first to flush the soil. With patience, your cocoa seedlings will grow into small trees in 1-2 years, ready for pruning and eventual outdoor planting (if you live in a tropical or subtropical climate).
Tips & tricks for perfect cocoa seed sprouting
Real talk: Germinating cocoa seeds is equal parts science and patience—but these tricks will help you skip the trial-and-error phase.
Soaking Secrets: The 24-hour soak isn't just about softening the shell—it's about breaking down the seed's natural inhibitors. Use a thermometer to confirm your warm water stays between 80-85°F. If it's cooler, place the dish on a seedling heat mat (set to low) during soaking. I've found that adding a pinch of cinnamon to the soak water can help prevent mold without harming the seeds.
Humidity Hack: That 70-80% humidity range is critical, but achieving it can be tricky. Instead of just misting, try placing a shallow tray of water near your seedling setup—evaporation will naturally boost humidity. For extra insurance, group multiple pots together; they'll create a microclimate that maintains moisture levels. Watch for condensation on the plastic dome—if it's dripping, you're overdoing it and risking fungal growth.
Light Transition Tip: When you're ready to remove the plastic cover over 3-5 days, do it gradually by propping one side up daily. This mimics the natural light adaptation cocoa seedlings experience in their native habitats. If you notice your seedlings stretching toward the light (leggy growth), switch to a stronger grow light or move them closer to a south-facing window. The goal is balanced growth, not rapid vertical growth.
Troubleshooting Slow Starters: If you don't see those white roots in 3-7 days, don't panic—but do check three things: 1) Is the towel damp but not soaked? 2) Is the temperature consistently between 70-80°F? 3) Are the seeds still firm? If they feel mushy, they may have started rotting. In this case, remove them and start fresh with new seeds—sometimes the seed quality varies even within the same package.
Pro Tips for Cocoa Seed Germination
- Real talk: Germinating cocoa seeds is equal parts science and patience—but these tricks will help you skip the trial-...
- Soaking Secrets: The 24-hour soak isn't just about softening the shell—it's about breaking down the seed's natural in...
- Humidity Hack: That 70-80% humidity range is critical, but achieving it can be tricky. Instead of just misting, try p...
Frequently asked questions
How long does it take for cocoa seeds to germinate?
Under ideal conditions—consistent warmth (75–85°F), high humidity (80–90%), and indirect light—cocoa seeds typically sprout within 14–21 days. Some seeds may take slightly longer, especially if stored improperly or exposed to temperature fluctuations. Patience is key! Monitor moisture levels to avoid drying out the seeds.
What if my cocoa seeds aren’t germinating after 3 weeks?
If your seeds show no signs of sprouting after 21 days, check these common issues:
- Temperature: Ensure they’re in a warm, stable environment (a seedling heat mat helps).
- Moisture: Keep the medium damp (not soggy) but avoid waterlogging.
- Viability: Test a few seeds in warm water—if they sink, they’re likely viable. Floaters may be dead.
- Light: Bright, indirect light is critical; direct sun can scorch them.
Can I germinate cocoa seeds without a humidity dome?
Yes! While a humidity dome or plastic wrap speeds up germination, you can use alternatives like:
- A spray bottle to mist seeds daily (keep them consistently moist).
- A clear plastic bag over the container (poke holes for airflow).
- A pebble tray with water beneath the container to increase ambient humidity.
How do I transplant germinated cocoa seedlings?
Once seedlings develop 2–3 true leaves (usually 3–4 weeks post-germination), they’re ready for transplanting. Use a well-draining potting mix (cocoa loves slightly acidic soil, pH 5.5–6.5). Gently remove the seedling, loosen roots, and plant it no deeper than it was in the germination container. Water lightly and place in bright, indirect light.
Can I eat the sprouted cocoa seeds after germination?
While raw cocoa seeds are edible (used in chocolate-making!), germinated seeds lose their typical flavor and cocoa butter content. If you’re growing for propagation, focus on the seedlings. However, you can roast and grind ungerminated seeds for homemade cocoa powder—just ensure they’re fresh and properly prepared.
Wrapping up and next steps
Mastering cocoa seed germination is all about patience, precision, and the right environment—especially humidity! 🌱 With the right setup, you can watch those tiny seeds sprout into thriving seedlings in just three weeks. Remember, consistency in moisture and warmth is key, and don’t hesitate to troubleshoot if things feel off.
Now that you’re armed with the know-how, why not take the next step? Try experimenting with different humidity levels or even scaling up your setup. Happy growing—and may your cocoa seeds bring you (and your future chocolate treats!) big rewards! 🍫✨